Configuration of WireGuard Server on Linux
Alan HoltСпособ №1
The below is just a short introduction to give an understanding how it works on Ubuntu. For other Linux distributions please have a look at the official WireGuard installation instructions.
First install the wireguard package.
add-apt-repository ppa:wireguard/wireguard && \
apt-get update && apt-get install wireguard
Create a public and private keypair for the server using the wg(8) tool.
wg genkey | tee server_private | wg pubkey > server_public
Then create a keypair for the client:
wg genkey | tee client_private | wg pubkey > client_public
The keys are just short strings that can be easily copied and pasted from the terminal.
cat client_private client_public
sAHRG4iRj8JekFDgNuevjNwMPuNDIVbTfFuZu9dBY1o=
T/DjhrM8hkbqYnOYQvHExF0HI/Csi6DktQth5ijcpDI=
Load the kernel module and create a WireGuard network interface using ip-link(8).
ip link add dev wg0 type wireguard
Configure an IP address of the server using ip-address(8).
ip address add dev wg0 192.168.2.1/24
Configure the private key of the server and add the client's public key using the wg(8) tool. In this example we use UDP port 8040 but you may choose a port of your liking. Ensure this port is properly mapped through your router if you want to access your WireGuard server from the Internet.
wg set wg0 listen-port 8040 private-key server_private
wg set wg0 peer `cat client_public` allowed-ips 192.168.2.0/24
Activate the newly configured network interface using ip-link(8).
ip link set up dev wg0
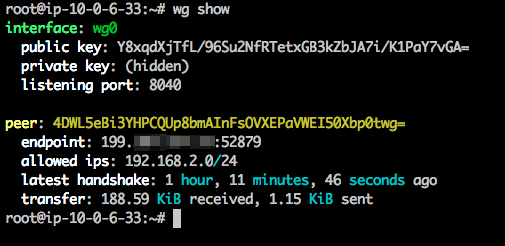
All done, verify that WireGuard is properly configured with the wg(8) tool. It should look similar to this.
Способ №2
Generate server config
Create a file called /etc/wireguard/wg0.conf on the server and add the following content.
[Interface]
Address = 192.168.2.1/24
SaveConfig = true
PrivateKey = <insert server_private_key>
ListenPort = 8040

[Peer]
PublicKey = <insert client_public_key>
AllowdIPs = 192.168.2.2/24
wg0.conf will result in an interface named wg0 therefore you can rename the file if you fancy something different.
AllowedIPs = 192.168.2.2/32 provides enhanced security by ensuring that only that a client with the IP 10.200.200.2 and the correct private key will be allowed to authenticate on the VPN tunnel .
ListenPort is the udp port to listen on. A different one can be used.
Generate client config
Create a file called wg0-client.conf on the client and add the following content.
[Interface]
Address = 192.168.2.2/24
PrivateKey = <insert client_private_key>
#DNS = 192.168.2.1
PostUp = echo nameserver 8.8.8.8 | resolvconf -a tun.%i -m 0 -x
PostDown = resolvconf -d tun.%i

[Peer]
PublicKey = <insert server_public_key>
Endpoint = <insert vpn_server_address>:8040
AllowdIPs = 0.0.0.0/24
PersistentKeepalive = 21
Similar to the server case, wg0-client.conf will result in an interface named wg0-client so you can rename the file if you fancy something different.
AllowedIPs = 0.0.0.0/0 will allow and route all traffic on the client through the VPN tunnel. This can be narrowed down if you only want some traffic to go over VPN.
DNS = 192.168.2.1 will set the DNS resolver IP to our VPN server. This is important to prevent DNS leaks when on the VPN.
Enable the WireGuard interface on the server
chown -v root:root /etc/wireguard/wg0.conf
chmod -v 600 /etc/wireguard/wg0.conf
wg-quick up wg0
systemctl enable wg-quick@wg0.service
Enable IP forwarding on the server
vim /etc/sysctl.conf
net.ipv4.ip_forward=1
sysctl -p
echo 1 > /proc/sys/net/ipv4/ip_forward
More here: https://www.ckn.io/blog/2017/11/14/wireguard-vpn-typical-setup/