Cluster Environment Building
https://medium.com/aws-in-plain-english/cluster-environment-building-887e750ef4b5
Environmental Planning
Cluster Type
- There are two broad categories of kubernetes clusters: one master, many slaves and multiple master, many slaves.
- Multi-master and multi-slave: multiple Master nodes and multiple Node nodes, troublesome to build, high security, suitable for production environment
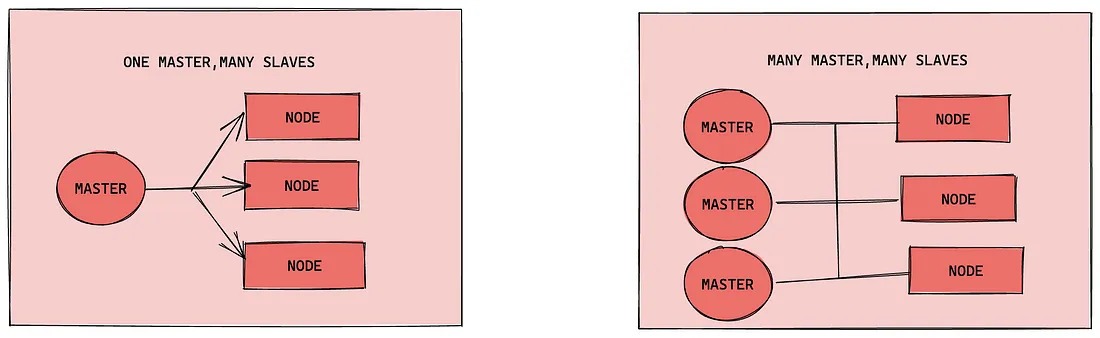
Note: For the sake of simplicity in testing, this build is a one-master-two-slave type of cluster
Installation method
kubernetes has a variety of deployment methods, the current mainstream methods are kubeadm, minikube, binary package
- minikube: a tool for quickly building single-node kubernetes
- kubeadm: a tool for quickly building kubernetes clusters
- Binary package: Download the binary package of each component from the official website and install them in turn.
Description: Now I need to install the kubernetes cluster environment, but I don’t want to bother too much, so I choose to use the kubeadm method
Host Planning
| Role | IP Address | Operating System | Configuration |
| — — — | — — — — — — — — | — — — — — — — — — — — — — — | — — — — — — — — — — — — |
| Master | 192.168.109.101 | Centos7.5 Infrastructure Server | 2 CPUs 2G RAM 50G HDD |
| Node1 | 192.168.109.102 | Centos7.5 Infrastructure Server | 2 CPUs 2G RAM 50G HDD |
| Node2 | 192.168.109.103 | Centos7.5 Infrastructure Server | 2 CPUs 2G RAM 50G HDD |
Environment Construction
This environment requires three Centos servers (one master and two slaves) to be installed, and then docker (18.06.3), kubeadm (1.17.4), kubelet (1.17.4), and kubectl (1.17.4) programs to be installed in each server respectively.
Mainframe Installation
During the virtual machine installation, pay attention to the settings of the following options.
- Operating system environment: CPU (2C) Memory (2G) Hard disk (50G)
- Language selection: Chinese Simplified
- Software Selection: Infrastructure Server
- Partition selection: automatic partitioning
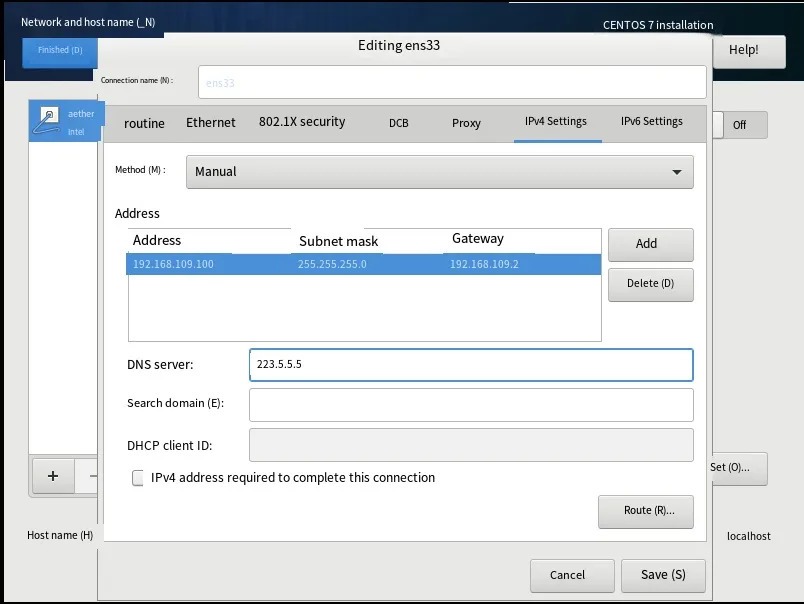
- Network configuration: Configure the network address information according to the following
Network address: 192.168.109.100 (each host is different, 100, 101, 102 respectively)
Subnet mask: 255.255.255.0
Default gateway: 192.168.109.2
DNS: 223.5.5.5
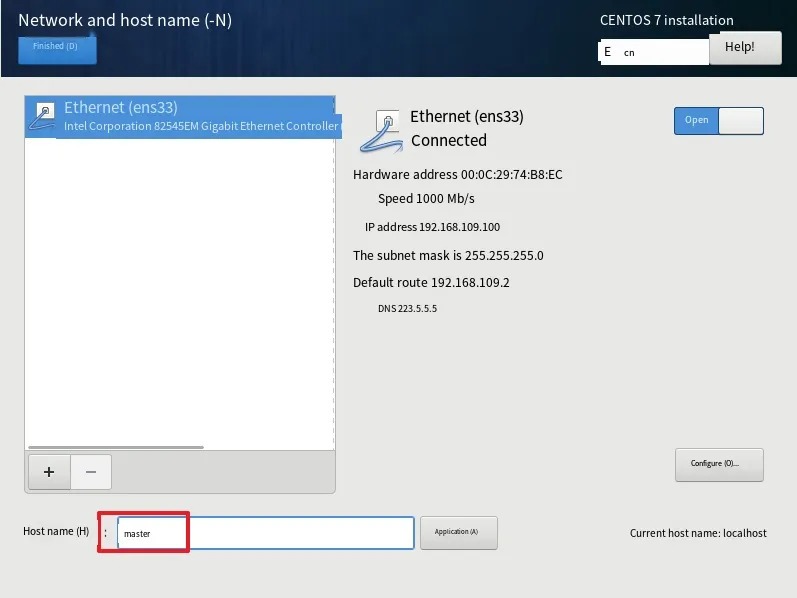
- Hostname setting: Set the hostname according to the following information
master node: master
node node: node1
node node: node2
Environment initialization
- Check the version of the operating system
# This method of installing a kubernetes cluster requires Centos version 7.5 or higher
[root@master ~]# cat /etc/redhat-release
CentOS Linux release 7.5.1804 (Core)
2) Host name resolution
To facilitate direct calls between cluster nodes later, configure host name resolution here, internal DNS servers are recommended in the enterprise
# hostname into resolution Edit the /etc/hosts file of the three servers and add the following
192.168.109.100 master
192.168.109.101 node1
192.168.109.102 node2
3) Time synchronization
kubernetes requires that the time of the nodes in the cluster must be precisely the same, and here the time is synchronized directly from the network using the chronyd service.
It is recommended to configure internal time synchronization server in the enterprise
# start chronyd service
[root@master ~]# systemctl start chronyd
# set chronyd service to start on boot
[root@master ~]# systemctl enable chronyd
# chronyd service start for a few seconds, then you can use the date command to verify the time
[root@master ~]# date
4) Disable iptables and firewalld services
kubernetes and docker will generate a lot of iptables rules in operation, so in order not to confuse the system rules with them, just turn off the system rules
# 1 Close the firewalld service
[root@master ~]# systemctl stop firewalld
[root@master ~]# systemctl disable firewalld
# 2 Close iptables service
[root@master ~]# systemctl stop iptables
[root@master ~]# systemctl disable iptables
5) Disable selinux
selinux is a security service under linux systems that, if not turned off, can create all sorts of oddball problems in the installation cluster
# Edit the /etc/selinux/config file and change the SELINUX value to disabled
# Note that you need to restart the linux service after the change
SELINUX=disabled
6) Disable swap partition
The swap partition refers to the virtual memory partition, which is used to virtualize the disk space into memory after the physical memory is used up
Enabling swap devices can have a very negative impact on system performance, so kubernetes requires that swap devices be disabled on every node
However, if for some reason you really can’t close the swap partition, you need to configure it with explicit parameters during the cluster installation
# Edit the partition configuration file /etc/fstab and comment out the swap partition line
# Note that you need to restart the linux service after the changes are made
 UUID=455cc753-7a60-4c17-a424-7741728c44a1 /boot xfs defaults 0 0
 /dev/mapper/centos-home /home xfs defaults 0 0
# /dev/mapper/centos-swap swap swap defaults 0 0
7) Modify the kernel parameters of linux
# Modify the kernel parameters of linux to add bridge filtering and address forwarding
# Edit the /etc/sysctl.d/kubernetes.conf file and add the following configuration:
net.bridge.bridge-nf-call-ip6tables = 1
net.bridge.bridge-nf-call-iptables = 1
net.ipv4.ip_forward = 1

# Reload the configuration
[root@master ~]# sysctl -p

# Load the bridge filter module
[root@master ~]# modprobe br_netfilter

# Check if the bridge filter module is loaded successfully
[root@master ~]# lsmod | grep br_netfilter
8) Configure ipvs function
There are two proxy models for service in kubernetes, one based on iptables and one based on ipvs
When comparing the two, the performance of ipvs is obviously higher, but to use it, you need to load the ipvs module manually
# 1 Install ipset and ipvsadm
[root@master ~]# yum install ipset ipvsadmin -y

# 2 Add the modules that need to be loaded to the script file
[root@master ~]# cat <<EOF > /etc/sysconfig/modules/ipvs.modules
#! /bin/bash
modprobe -- ip_vs
modprobe -- ip_vs_rr
modprobe -- ip_vs_wrr
modprobe -- ip_vs_sh
modprobe -- nf_conntrack_ipv4
EOF

# 3 Add execute permissions to the script file
[root@master ~]# chmod +x /etc/sysconfig/modules/ipvs.modules

# 4 Execute the script file
[root@master ~]# /bin/bash /etc/sysconfig/modules/ipvs.modules

# 5 Check if the corresponding module is loaded successfully
[root@master ~]# lsmod | grep -e ip_vs -e nf_conntrack_ipv4
9) Restart the server
After the above steps are completed, you need to reboot your linux system
[root@master ~]# reboot
Installing docker
# 1 Switch the image source
[root@master ~]# wget https://mirrors.aliyun.com/docker-ce/linux/centos/docker-ce.repo -O /etc/yum.repos.d/docker-ce.repo

# 2 Check the supported docker versions in the current image source
[root@master ~]# yum list docker-ce --showduplicates

# 3 Install a specific version of docker-ce
# You must specify --setopt=obsoletes=0, otherwise yum will automatically install a higher version
[root@master ~]# yum install --setopt=obsoletes=0 docker-ce-18.06.3.ce-3.el7 -y

# 4 Add a configuration file
# Docker uses the Cgroup Driver as cgroupfs by default, while kubernetes recommends using systemd instead of cgroupfs
[root@master ~]# mkdir /etc/docker
[root@master ~]# cat <<EOF > /etc/docker/daemon.json
{
  "exec-opts": ["native.cgroupdriver=systemd"],
  "registry-mirrors": ["https://kn0t2bca.mirror.aliyuncs.com"]
}
EOF

# 5 Start docker
[root@master ~]# systemctl restart docker
[root@master ~]# systemctl enable docker

# 6 Check docker status and version
[root@master ~]# docker version
Installing kubernetes components
# Since the kubernetes image source is abroad, it is slow, so switch to a domestic image source here
# Edit /etc/yum.repos.d/kubernetes.repo and add the following configuration
[kubernetes]
name=Kubernetes
baseurl=http://mirrors.aliyun.com/kubernetes/yum/repos/kubernetes-el7-x86_64
enabled=1
gpgcheck=0
repo_gpgcheck=0
gpgkey=http://mirrors.aliyun.com/kubernetes/yum/doc/yum-key.gpg
       http://mirrors.aliyun.com/kubernetes/yum/doc/rpm-package-key.gpg

# install kubeadm, kubelet and kubectl
[root@master ~]# yum install --setopt=obsoletes=0 kubeadm-1.17.4-0 kubelet-1.17.4-0 kubectl-1.17.4-0 -y

# Configure the kubelet cgroup
# Edit /etc/sysconfig/kubelet and add the following configuration
KUBELET_CGROUP_ARGS="--cgroup-driver=systemd"
KUBE_PROXY_MODE="ipvs"

# 4 Set kubelet to boot from
[root@master ~]# systemctl enable kubelet
Preparing the cluster image
# Before installing the kubernetes cluster, you must prepare the images needed for the cluster in advance, which can be viewed with the following command
[root@master ~]# kubeadm config images list

# download images
# The images are in the kubernetes repository, which cannot be connected for network reasons, so here is an alternative
images=(
    kube-apiserver:v1.17.4
    kube-controller-manager:v1.17.4
    kube-scheduler:v1.17.4
    kube-proxy:v1.17.4
    pause:3.1
    etcd:3.4.3-0
    coredns:1.6.5
)

for imageName in ${images[@]} ; do
 docker pull registry.cn-hangzhou.aliyuncs.com/google_containers/$imageName
 docker tag registry.cn-hangzhou.aliyuncs.com/google_containers/$imageName k8s.gcr.io/$imageName
 docker rmi registry.cn-hangzhou.aliyuncs.com/google_containers/$imageName
done
Cluster initialization
The following starts the initialization of the cluster and adds the node nodes to the cluster
The following operation only needs to be executed on the `master` node
# Create a cluster
[root@master ~]# kubeadm init
--kubernetes-version=v1.17.4 (-pod-network-cidr=10.244.0.0/16
    --pod-network-cidr=10.244.0.0/16\
    --service-cidr=10.96.0.0/12 (service).
    --apiserver-advertise-address=192.168.109.100

# Create necessary files
[root@master ~]# mkdir -p $HOME/.kube
[root@master ~]# sudo cp -i /etc/kubernetes/admin.conf $HOME/.kube/config
[root@master ~]# sudo chown $(id -u):$(id -g) $HOME/.kube/config
The following operation only needs to be performed on the `node` node
# Join the node node to the cluster
[root@master ~]# kubeadm join 192.168.109.100:6443 \
 --token 8507uc.o0knircuri8etnw2 \
 --discovery-token-ca-cert-hash \
 sha256:acc37967fb5b0acf39d7598f8a439cc7dc88f439a3f4d0c9cae88e7901b9d3f

# View cluster status The cluster status is NotReady at this point, because the network plugin has not been configured yet
[root@master ~]# kubectl get nodes
NAME STATUS ROLES AGE VERSION
master NotReady master 6m43s v1.17.4
node1 NotReady <none> 22s v1.17.4
node2 NotReady <none> 19s v1.17.4
Installing network plug-ins
The following operation is still executed only on the `master` node, the plugin uses the DaemonSet controller, which runs on every node
# Get the configuration file for the channel
[root@master ~]# wget https://raw.githubusercontent.com/coreos/flannel/master/Documentation/kube-flannel.yml

# Modify the quay.io repository in the file to quay-mirror.qiniu.com

# Start the fannel with the configuration file
[root@master ~]# kubectl apply -f kube-flannel.yml

# Wait for a moment and check the status of the cluster nodes again
[root@master ~]# kubectl get nodes
NAME STATUS ROLES AGE VERSION
master Ready master 15m v1.17.4
node1 Ready <none> 8m53s v1.17.4
node2 Ready <none> 8m50s v1.17.4
At this point, the kubernetes cluster environment is built
Service Deployment
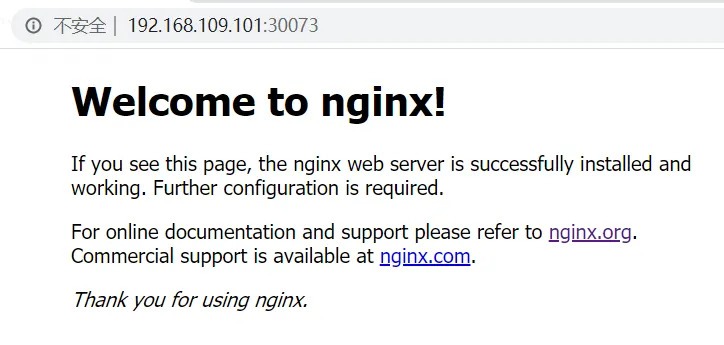
Next, deploy an nginx application in the kubernetes cluster to test if the cluster is working properly.
# Deploy nginx
[root@master ~]# kubectl create deployment nginx --image=nginx:1.14-alpine

# expose port
[root@master ~]# kubectl expose deployment nginx --port=80 --type=NodePort

# Check service status
[root@master ~]# kubectl get pods,service
NAME READY STATUS RESTARTS AGE
pod/nginx-86c57db685-fdc2k 1/1 Running 0 18m

NAME TYPE CLUSTER-IP EXTERNAL-IP PORT(S) AGE
service/kubernetes ClusterIP 10.96.0.1 <none> 443/TCP 82m
service/nginx NodePort 10.104.121.45 <none> 80:30073/TCP 17m

# 4 Finally, access the deployed nginx service on the computer