Channel Help Guide - Paid Functions
Channel Help
This guide will explain the paid features that Channel Help offers in addition to the classic ones that are and will remain free.
It is necessary to subscribe to one of the two plans available for each channel in which we want to use the paid features.
Plus
The first subscription plan is the Plus, which can be activated in a channel at a price of € 1.99 per month.
The paid features that can be obtained with the Plus plan are:
• Creation of up to 5 recurring posts
• Custom bot for welcome posts
Premium
The second subscription plan is the Premium, which can be activated in a channel at a price of € 4.99 per month.
The paid features that can be obtained with the Premium plan are:
• Create up to 50 recurring posts
• Maximum sending priority among all posts of all channels managed by Channel Help
Index
• Basic bot guide
• Recurring posts
• Time
• Recurrence
• Days of the week
• Days of the month
• Time slot
• Start date and end date
• Delete last post
• Welcome with custom bot
• Delayed approval
• Auto-complete
• Multipost
• Publication calendar
• Virtual Admins
Recurring posts - Once created, you won't think about it anymore
Do you need to always send the same post over and over every day, hour or minute?
Or even every month but only on certain days?
Recurring posts are what you are looking for.
By making a post recurring you will be able to decide how often to repeat the sending in the channel, in a highly customizable way. In fact, it will be possible to decide a time from which to set the recurrence of the post, whether every minute, every hour, or every day.
You can also decide on which days of the week the post should be sent or even on which days of the month. Also, in case your post has to be sent every hour, you can decide a specific time slot in which to do it, for example only in the afternoon.
Finally, you can set a start date on which the recurring post will activate and proceed to send itself automatically and an end date on which it will stop doing it.
Recurring posts is one of the paid features available starting with the Plus plan.
So let's see how to proceed:

Once you get to the final Create post menu, you can decide to make the newly created post recurring by clicking on "Recurring post".

Once you press the button you will find yourself in the main menu, where you can actually make the post recurring once you click on "Save recurring post".
Let's see what are the available customizations:
• Time
Once you have set up your post customizations and hit the "Save Recurring Post" button, the post is ready to be sent repeatedly.

By clicking on "Edit post" it will be possible to double check and, if necessary, edit the recurrence settings, as well as edit the content of the post itself.
Time
The time of a recurring post is the starting point to then define its recurrence, that is how often to send it. For example, if the time is set at 3:32 with a recurrence of 2 hours, the post will be sent at 1:32, 3:32, 5:32, 7:32 and so on arriving until 23:32, for then come back at 1:32 and start over.
The hour must therefore be selected first, for example 2 o'clock.

Then the minutes, for example 32.

You will then return to the main menu, with the updated time in the bot message.

Recurrence
The recurrence of a recurring post is the time interval between between one sending and the other. You will find it set by default to "every 24 hours" and to change it just press the corresponding button.

In this case it was chosen for example every two hours.
Once pressed next, you can check the new recurrence set in the bot message.

Days of the week
With this customization you can decide on which days of the week the recurring post should be sent.
By default, all days of the week are selected:

But suppose, for example, that the recurring post doesn't have to be sent on a Wednesday. Just press the corresponding button and then the "Next" button to confirm your choice.

The days with the ❌ are the days when the post will not be sent.
Days of the month
With this customization you can decide on which specific days of the month the recurring post should be sent. If not even one day is selected, the post will be sent every day of the month, as if the customization did not exist.
Let's say instead that it is necessary to send it only the first two days:

Just select 1 and 2 and press "Next" to confirm your choice.
Time slot
With the time slot we can decide that the recurring post is sent only in a specific range of hours during the day.
For example, let's set a recurrence of one hour. The post will then be sent every hour throughout the day. However, in the event that the post has to be sent every hour throughout the day except in the afternoon, just set a time slot from 19 to 13; doing so will skip the afternoon hours.
So let's first select the start time of the time slot:

Then we select the end time:

At this point it will be possible to verify that the time slot has been set correctly and that consequently the post will be sent only from 19 to 13.

In case we want to return to send the post regularly, that is every hour, just press again on "Time slot" and then on "Delete time slot":

Start date and end date
You can set the start date, which is a date from which the post will start recurring. If no start date is set, the post will start recurring immediately after saving it.

It is therefore necessary to send a date in the formats available in the examples shown by the bot.
Once the start date is sent, the bot will show it in the message.

If you change your mind about the start date, you can change it by sending it again or delete it by clicking on the "Delete start date" button.

You can also set the end date, which is a date from which the post will cease to be recurring. If not set, the post will remain recurring until deleted or shut down.
The procedure for setting the end date is the same as for the start date.
Delete last post
By activating this customization it is possible to send a post repeatedly in the channel making sure that it is present in the chat at most once.
In fact, what happens is the cancellation of the post from the channel a moment before it is sent again, as if the last post sent overwrites the previous one.
Welcome with custom bot - The best welcome for new members
Do you want to welcome the new user with a welcome post sent automatically by a your personalized bot?
You are in the right place.
To find out how to set the welcome message, click here.
To set up a custom bot, access the "Welcome" section, then after selecting "Custom bot" we arrive at the menu where we can: set up one or more custom bots, decide for the channel we have chosen at the beginning which will be the bot that will send the welcome post and finally remove one of the set bots.
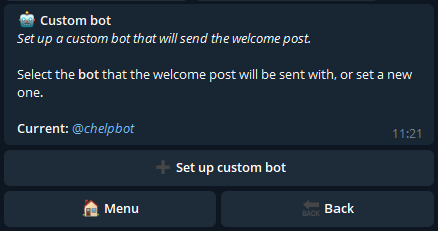
Pressing on "Set custom bot" we arrive at the following menu:

Follow the instructions sent by Channel Help, and if the procedure is successful you will have confirmation that you have set your bot as a custom welcome bot.

Attention: your bot must also be added to the channel (in the same way you added Channel Help) for it to be operational.
If you haven't already added it, going back will bring you to the start menu where Channel Help will still be the selected bot:

Only after adding your bot to the channel will you be able to select it and set it as the default.

Delayed approval - Waiting increases desire
Would you like to automatically approve every user who joins your channel, but only after a certain amount of time?
With Delayed Approval you can choose a period of time after which a user requesting to join the channel will be automatically approved by the bot.
So let's see how to proceed:

First you need to press the "Self-approval" button as suggested by the text of the message.

You can see that by default the setting is active on "Approve immediately". It is therefore necessary to select the period of time after which we want a user to be automatically approved.

Once selected, simply press "Next" and the Delayed Approval will be set.
Auto-complete - The feature that automates your channel
Do you need to send messages in which the content changes but not the outline elements and you are forced to add them every time for each message? Would you like to improve the graphics of your messages without losing the convenience of sending them directly to the channel chat? Auto-complete is the feature you are looking for.
With the Auto-complete feature you can set which elements you want to be added every time you send a message in the channel. From that moment on, just send the messages directly in the channel chat and Channel Help will automatically modify the message by adding the previously set elements!
Before:

After:

Auto-complete is one of the paid features available starting with the Plus plan.
So let's see how to proceed:

Once the channel has been selected we arrive at the initial menu of the feature, in which the additions to be set to the channel messages will be chosen.
First of all, if we want Channel Help to automatically complete the channel messages, it is necessary to activate the feature by pressing the first available button.
Subsequently, for each addition it is possible to press the corresponding button and send what we have decided to set.
Available additions are:
• Signature: text that will be added to the end of the message.
• Buttons: buttons that will be added under the message.
• Attach media: photos, videos or GIFs that will be attached at the end of the message.
• Separator sticker: sticker that will be sent after the message.
• Reactions: special buttons used to receive feedback from channel subscribers.
Let's see for example how to set the buttons and reactions for each message:

After pressing the "Buttons" button we arrive in the menu where the bot asks for the buttons to be set. We send the buttons to be set and confirm the changes.


Now that the bot has informed us that the addition has been changed we can go back and verify that the operation was successful. As you can see, a green check has now appeared to the left of the buttons.

By pressing the "View" button it will also be possible to view the buttons we have just added.
For the reactions, on the other hand, you must first activate them:


You can then customize them by pressing the left button and sending the reactions we want to set by separating them with a space (maximum six).

Multipost - The ultimate feature for organizing posts
If your channel has a fairly tight posting rate and it starts to be difficult to repeat the process of creating a post over and over again, this feature is for you.
In fact, with Multipost you can create several posts all at once, much more efficiently than the standard method. Not only that, creating them all together allows you to decide once and for all when they will be sent, if immediately, on a specific date, or according to your publication calendar.
Multipost is one of the paid features available starting from the Plus plan.
So let's see how to proceed:

Once the channel has been selected, we arrive at the initial menu of the feature, in which the general settings of the set of posts to be created will be chosen.
You can in fact decide the classic settings of the posts, but also if we want the signature of the channel to be added to each post to be created.
Finally it is possible to create a publication calendar which we will discuss later.
Once the initial settings have been decided and pressed on "Next" we arrive at the second menu of the feature:

At this point in order to proceed it is necessary to make a decision both for the buttons and for the reactions of the set of posts.
• Default: in the event that each post to be created must have the same buttons and/or the same reactions, press this button and send the buttons/reactions to the bot that will become predefined for each post.
• Always ask: if each post should have different buttons and/or reactions, this is the button to press.
• Do not ask: this is instead the case in which for each of the posts of the set no buttons and/or reactions must be added.
Once you have decided how to proceed, simply press next to get to the first step of creating a post.

At this point, as for the standard creation procedure, it is necessary to send what is needed to create the first post of the set.
Once you have sent everything you need, we arrive at the final menu of the newly created post.

It is now possible to decide how to proceed between 4 options:
• Next post: start the creation process again for the next post
• End multipost: finish the creation of the set of posts; this is the option to choose in case there are no other posts to create.
• Stop and cancel: permanently cancel the procedure by deleting all the posts created so far.
• Restart post: restart the creation of the current post from the beginning.
Then by pressing the "End multipost" button we arrive at the final menu of the feature in which various options are available that allow you to:
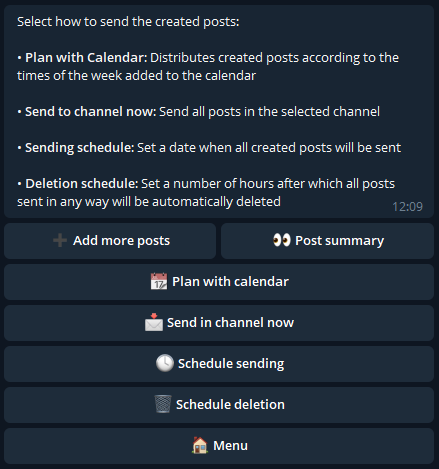
• Add more posts: go back to the post creation process.
• Post summary: check the posts created so far and, if necessary, delete those that have not been created correctly.
• Send in channel now: send all posts created in the selected channel at the beginning.
• Schedule sending: decide a specific date on which all posts will be sent. Once the date is set, the button above will become "Schedule in one channel".
• Schedule deletion: send the bot a number of hours after which posts will be automatically deleted from the channel in which they were sent.
• Plan with calendar: distribute the posts created according to the publishing times added to the calendar previously created.
Publication calendar
If multiple posts are published in your channel at the same times on specific days of the week, creating a publishing calendar is the best choice.
Once you have decided the publication times for each day of the week, you will be able to create as many posts as you want and let the bot distribute them on the days of the week at the times you have chosen, thus avoiding having to create and schedule all the posts one by one.
For example: you have entered 3pm on Monday and 4pm on Wednesday as publishing times in your calendar. By creating 6 posts and choosing the "Plan with calendar" option at the end of the Multipost procedure, the 6 newly created posts will be automatically scheduled for all Mondays at 3pm and Wednesdays at 4pm of the 3 weeks to come. If there were 8 posts, it would have been 4 weeks, if it had been 10, it would have been 5 weeks and so on.
So let's see how to create the calendar:

Once you have clicked on "Calendar" in the Multipost home menu, you can select the day of the week in which to add a publication time.
After pressing on "Add time" it is therefore necessary to send the time to the bot in one of the two possible formats as per example, that is standard and AM/PM.
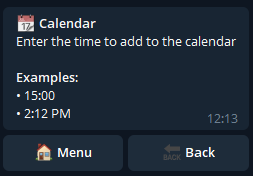
In case the second format is chosen, it is necessary to separate the time and AM/PM with a space.
When all the publishing times have been added, the creation of the calendar will be finished. In any case, it will be possible to change the calendar at any time by adding new times or deleting those already present.
Virtual Admins - Sometimes necessary protection
Your channel has gotten to the point where it is no longer manageable by just one person. It is therefore necessary to delegate work to an administrator who, with the right permissions, can help you with the creation of posts in the channel.
But what if this eventual administrator wants to do you a wrong?
He could decide to ban every single user subscribed to the channel.
In fact, Telegram does not in any way allow you to decide whether or not an administrator can ban other users from the channel. What to do then?
With the Virtual Admins feature you can promote a user to a virtual admin rather than a standard one. At that point that user will be able to choose: send, modify and / or delete posts through Channel Help, thus helping you to manage the channel without having the possibility to ban users who are subscribed to the channel.
Virtual admins is one of the paid features available with the Premium plan.
So let's see how to proceed: go to the "Users" menu then click on "Virtual admins".

Once in this menu you can add a virtual admin by pressing the button.

To do this, you can send the username or the id. Otherwise it is sufficient to forward to the bot any message sent by the user that we want to promote.
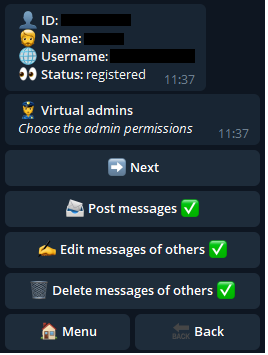
Once done, the bot will send the user's situation in the channel and their general information. If the user is subscribed to the channel and is not a normal administrator, it will be possible to decide his permissions, which have the same meaning as the standard Telegram permissions.
Once the permissions have been decided and pressed on "Next" the virtual admin will appear in the main menu, from which it will be possible to change the permissions by clicking on the name or remove it by clicking on the trash can.