Benchmarking Flutter for Games. Kind Of.
FlutterPulseThis article was translated specially for the channel FlutterPulseYou'll find lots of interesting things related to Flutter on this channel. Don't hesitate to subscribe!🚀
Hello, my name is Dmytro, and I'd like to share with you my attempt to measure Flutter's capabilities for rendering with a focus on game…
Hello, my name is Dmytro, and I'd like to share with you my attempt to measure Flutter's capabilities for rendering with a focus on game development. And how to bypass Flutter widget tree for it.
In Flutter's package ecosystem, we already have a solid framework called Flame. It seamlessly integrates with Flutter's widget tree, which is why it's easy to start with. It is great and can probably handle most types of 2D games.
However, my goal was to benchmark Flutter itself, which is why the first solution that came to mind was drawing with a CustomPainter widget. But what should I measure? How do I compare the results? Of course, a Bunnymark! It is a straightforward, widely used benchmark across many graphics libraries and game engines. While many game devs are familiar with it, I decided to implement it for Flutter as well.
The idea behind Bunnymark is simple: we take a small bunny texture and try to draw as many bunnies as possible while maintaining an acceptable frame time. What can we learn from it? Well, it gives you an idea of how many images or sprites you can draw before your game starts lagging. But that's only in theory. In practice, a real game has so much more going on each frame: physics, AI, game logic, and more. That's why we shouldn't take the results too seriously.
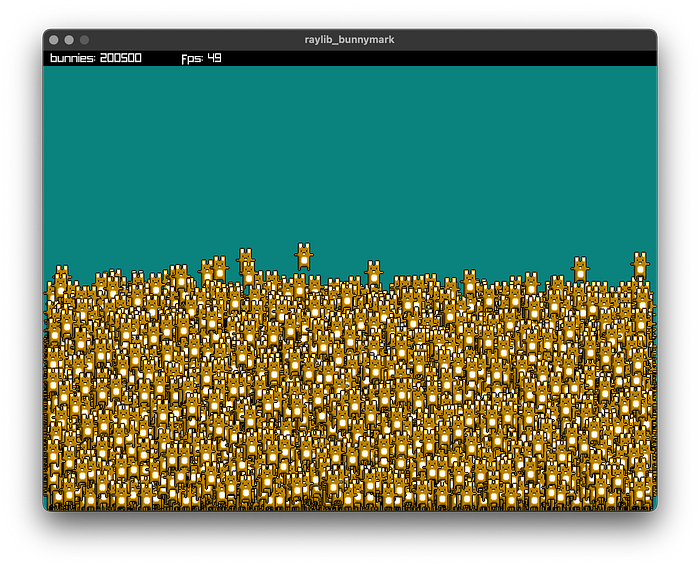
As a reference, we will use raylib. And here is what Bunnymark looks like:
I'm running all tests on an Apple M2 Max with 32GB RAM, macOS 15.6.1. The Raylib Bunnymark is built in release mode for ARM. On this machine, I get a stable 60 FPS up to about 150000 bunnies on screen. After that point, the FPS starts to drop. See the screenshot.
You can find the Raylib version here: https://gist.github.com/posxposy/cd8436d3b07724b22f3e68f58ab4a501
The code is very simple. Raylib already has batching under the hood, and that's what we'll need to achieve as well.
Part 1. Write a benchmark.
So, let's start with our bunnies! First, we want to describe our bunny as an entity. Nothing particularly special:
final class Bunny {
  double x;
  double y;
  double speedX = 0;
  double speedY = 0;

  Bunny({required this.x, required this.y, this.speedX = 0, this.speedY = 0});
}
The next step is to load our image from assets:
final byteData = await rootBundle.load(pathToBunnyImage);
ui.decodeImageFromList(byteData.buffer.asUint8List(), (ui.Image image) {
  // We can grab loaded image from that place and pass it to painter
});
But how do we actually draw an image with Canvas? The naive and simple solution would be:
final class ImagePainter extends CustomPainter {
  final List<Bunny> bunnies;
  final ui.Image image;

  ImagePainter({required this.bunnies, required this.image});

  @override
  void paint(Canvas canvas, Size size) {
    final paint = Paint();
    final w = image.width;
    final h = image.height;
    for (final bunny in bunnies) {
      canvas.drawImage(image, Offset(bunny.x - w / 2.0, bunny.y - h / 2.0), paint);
    }
  }

  @override
  bool shouldRepaint(covariant CustomPainter oldDelegate) => ...;
}
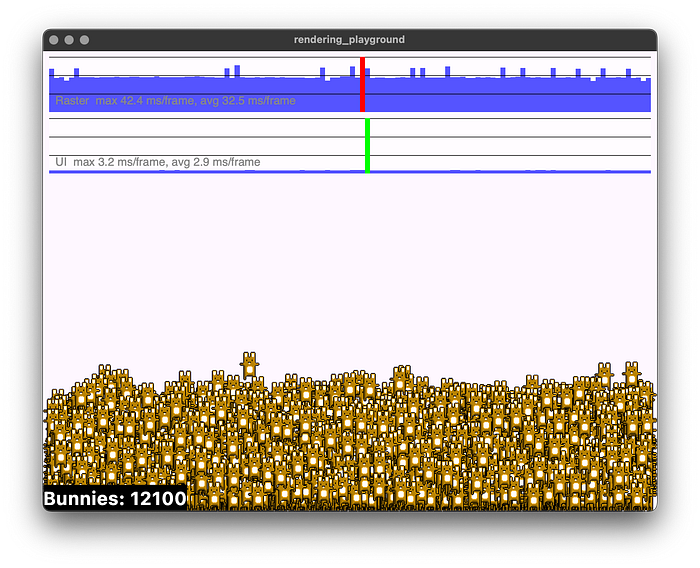
Using this approach, my machine can draw around 10,000 bunnies with both Skia and Impeller (in profile/release mode) until the raster thread starts dying! Yay! At this point, we could start interpreting the results, and that could be the end of the article, but…
The main problem with the drawImage method is that every time you call it, it submits your data to the renderer, which then produces a so-called draw call. And of course, there's also some additional overhead in Flutter itself, since it needs to pass data from your Dart code to the native rendering backend (Skia/Impeller). So the lesson here is clear: if we want to draw a lot of things on screen, we should avoid making unnecessary draw calls.
Looking deeper into the Canvas API, we can find one interesting method that draws vertices instead of images:
void drawVertices(Vertices vertices, BlendMode blendMode, Paint paint);
There are also other drawing methods, for example, drawAtlas and drawRawAtlas, which allows you to draw different parts from a single atlas image in an effective way. I will stick with drawVertices because it is more general-purpose solution.
To simplify things: in 2D space, a vertex is just a point with x and y coordinates. Games typically draw stuff on the screen using triangles; a triangle contains three vertices. And guess what? Two triangles together form a rectangle! If you're already familiar with this stuff, feel free to skip this annoying part of the article and jump directly to Part 2.

Next, let's look at the Vertices class. There are two ways to construct it:
Vertices(
  VertexMode mode,
  List<Offset> positions, {
  List<Color>? colors,
  List<Offset>? textureCoordinates,
  List<int>? indices,
})

Vertices.raw(
  VertexMode mode,
  Float32List positions, {
  Int32List? colors,
  Float32List? textureCoordinates,
  Uint16List? indices,
})
We want to avoid unnecessary overhead, which is why we will use the raw constructor. The idea behind it is that you pack all the bunny data into a set of lists and then call drawVertices once for all of them! With this approach, we can draw rectangles (two triangles per rect) matching the size of our image and achieve the same result as drawImage, but in a much more efficient way. Cool, right?
You probably noticed that it uses Float32List, Int32List, and Uint16List. These are efficient numeric containers suited for this kind of work.
The packing logic for our bunny data is simple, but it may be a bit tricky at first. Instead of packing the bunny's position directly (like bunny.x, bunny.y), we need to pack the positions of the vertices of the two triangles that form the rectangle representing a bunny image. And to draw the image on that rectangle, we also need local texture coordinates. These are usually called UVs. All of this is well covered in any OpenGL-like tutorial, so I won't repeat it here and will just show an example of how we pack the vertex positions and UVs:
final w = image.width.toDouble();
final h = image.height.toDouble();
// We want to center our rect so we will need half of the image size:
final hw = w / 2.0;
final hh = h / 2.0;

const coordsPerVertex = 2; // x and y of the vertex
const verticesPerQuadWithIndices = 4; // our rect is 4 vertices

for (int i= 0; i< bunnies.length; i++) {
  final bunny = bunnies[i];
  final x = bunny.x;
  final y = bunny.y;

  final vertexOffset = i * verticesPerQuadWithIndices * coordsPerVertex;

  // Vertex A
  positions[vertexOffset + 0] = -hw + x;       // x
  positions[vertexOffset + 1] = -hh + y;       // y
  textureCoordinates[vertexOffset + 0] = 0.0; // u
  textureCoordinates[vertexOffset + 1] = 0.0; // v

  // Vertex B
  positions[vertexOffset + 2] = hw + x;
  positions[vertexOffset + 3] = -hh + y;
  textureCoordinates[vertexOffset + 2] = w;
  textureCoordinates[vertexOffset + 3] = 0.0;

  // Vertex C
  positions[vertexOffset + 4] = hw + x;
  positions[vertexOffset + 5] = hh + y;
  textureCoordinates[vertexOffset + 4] = w;
  textureCoordinates[vertexOffset + 5] = h;

  // Vertex D
  positions[vertexOffset + 6] = -hw + x;
  positions[vertexOffset + 7] = hh + y;
  textureCoordinates[vertexOffset + 6] = 0.0;
  textureCoordinates[vertexOffset + 7] = h;
}
You may have noticed that we are using four vertices instead of six. And yes, wecould use six. However, that would be less efficient. Two connected triangles always share two vertices, which means we don't want to duplicate them in our position and UV lists.
Instead, we create another list that contains indices, which tell the GPU how to move from one vertex to another to draw a triangle. Indices are pointers into the vertex positions list. They allow you to reuse the same vertex data multiple times and reorder it however you need. Typically, six indices represent a rectangle (a quad):
const indicesPerQuad = 6;
const verticesPerQuadWithIndices = 4;
for (int i= 0; i < bunnies.length; i++) {
  final indexOffset = i * indicesPerQuad;
  final baseIndex = i * verticesPerQuadWithIndices;
  _indices[indexOffset + 0] = baseIndex + 0;
  _indices[indexOffset + 1] = baseIndex + 1;
  _indices[indexOffset + 2] = baseIndex + 2;
  _indices[indexOffset + 3] = baseIndex + 0;
  _indices[indexOffset + 4] = baseIndex + 2;
  _indices[indexOffset + 5] = baseIndex + 3;
}
This will give us a list like this:
[
  0, 1, 2, 0, 2, 3, // first rect/quad indices
  4, 5, 6, 4, 6, 7, // second react/quad indices
  ...
]
There is one important thing. For indices, we use Uint16List, which allows us to reference up to 65535unique vertices in a single draw call. That's why we need to implement batching. It's not really hard to do.
  const verticesPerQuadWithIndices = 4;
  const indicesPerQuad = 6;
  const maxVertices = 65535;

  // Use 16383 bunnies per batch
  const bunniesPerBatch = maxVertices ~/ verticesPerQuadWithIndices;
Using a bunniesPerBatch value, we can split our positions, texture coordinates, and indices into individual batches and call drawVertices for each batch, where each one contains 16383 bunnies. And hey! That's already more than I can draw on my machine using just drawImage. The batching loop may look like this:
final batches = (_bunnies.length / bunniesPerBatch).ceil();
for (int i = 0; i < batches; i++) {
  // here we fill our positions,
  // texture coordinates and indices for every batch

  // then construct a Vertices object
  final vertices = Vertices.raw(
    VertexMode.triangles,
    positions,
    indices: indices,
    textureCoordinates: textureCoordinates,
  );

  // and draw whole bunnies in batch at once
  canvas.drawVertices(vertices, BlendMode.srcOver, paint);
}
Keep in mind that we're pushing everything to the limit here. In a real game, I would recommend using smaller batches — something like 2048 quads per batch. Or anywhere between 1024 and 4096, depending on your needs. It will be less CPU-intensive, more memory-efficient, and generally safer. And again, real games usually don't need to draw that many quads on the screen at once. Filling buffers that are too large may just waste CPU time and memory for no real benefit.
Part 2. Testing
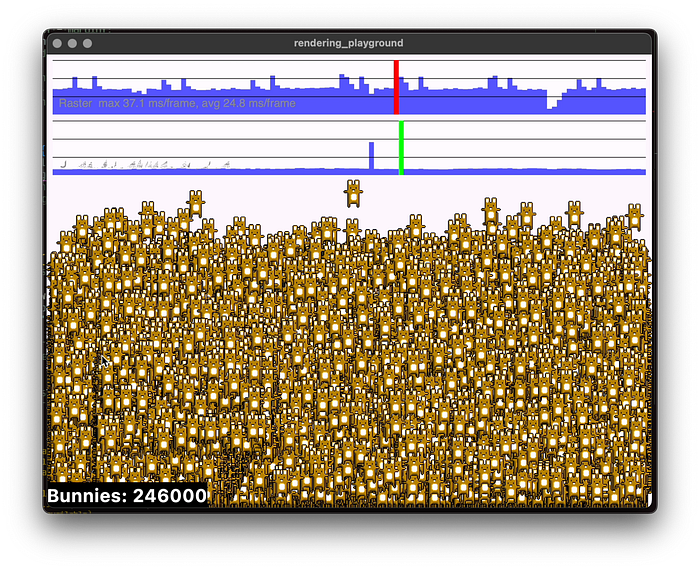
The most fun part is running the test. And the results are pretty impressive. On my machine, I can achieve around 250000 bunnies with a stable frame time on the Skia backend. It is more than I can do with the raylib default batching.
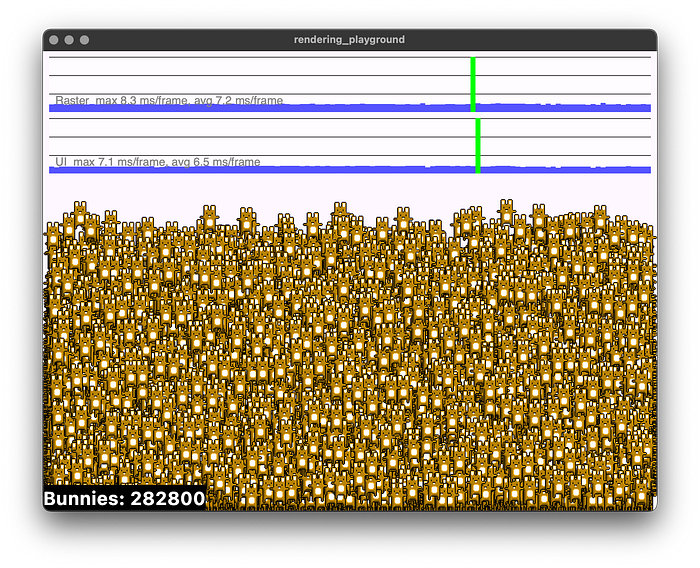
After 250k, I started seeing random UI thread spikes, which are probably caused by GC. I should also mention that I tried to cache as many calculations as possible to reduce CPU and GC pressure. Dart DevTools and the CPU profiler were very helpful for that.
On the other hand, when I ran the test with Impeller, it started glitching after roughly 150-160k bunnies. You can notice it by looking at the raster thread graph:
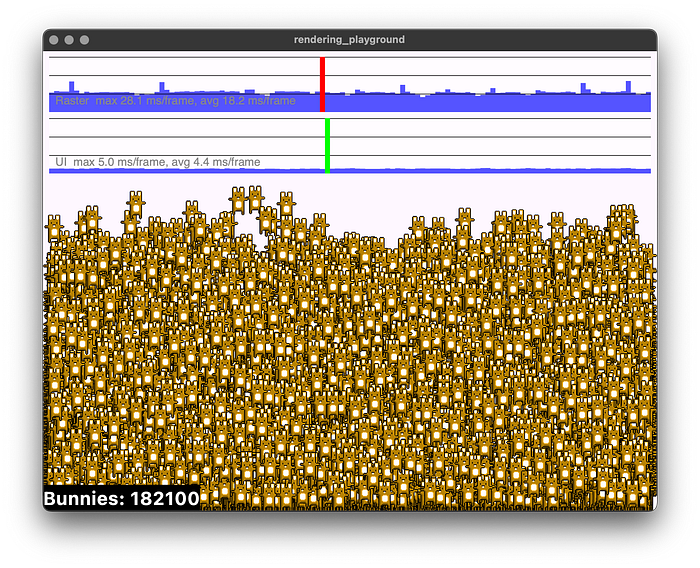
It's not visible on the screenshot, but some frames were randomly broken, and it's hard to say why. It wasn't easy to catch those artifacts, but here is an example:
So yes, Skia outperforms Impeller here: 250k vs 150k. But let's be fair, we shouldn't judge them solely on this. Impeller was created to solve issues with shader compilation, janks, and to improve vector graphics rendering in general. That's why we can't meaningfully compare them based on a single benchmark like this.
I truly believe that moving from Skia to Impeller was the right strategic choice. While Impeller is not fully finished yet and definitely needs improvements, it already gives you access to vertex shaders, while Skia is limited to fragment shaders only. And that makes a huge difference when building more advanced graphics.
That's probably may be the ending, but…
Part 3. Can we do better?
Writing this bunnymark, I constantly asked myself one question: do we really need the widget tree for game-like projects? Most games simply run a game loop under the hood, and that's all you really need for that task:
while(appIsRunning) {
   processEvents();
   update(deltaTime);
   draw();
}
Can we achieve this with Flutter? Can we drop all the MaterialApp/WidgetsApp stuff?
Sure! Check this out: you can create a new empty Flutter project and just replace your main.dart file with this code:
import 'dart:ui';

late final FlutterView view;

void beginFrame(Duration timeStamp) {
  final devicePixelRatio = view.devicePixelRatio;
  final size = view.physicalSize / devicePixelRatio;
  final bounds = Offset.zero & (size * devicePixelRatio);

  final recorder = PictureRecorder();
  final canvas = Canvas(recorder, bounds);
  canvas.scale(devicePixelRatio, devicePixelRatio);

  final paint = Paint();
  paint.color = const Color.fromARGB(255, 10, 130, 125);
  canvas.drawRect(Offset.zero & size, paint);

  paint.color = const Color.fromARGB(255, 255, 191, 0);
  canvas.drawCircle(
    size.center(Offset.zero),
    size.shortestSide * 0.45,
    paint,
  );

  final picture = recorder.endRecording();

  final sceneBuilder = SceneBuilder()
    ..pushClipRect(bounds)
    ..addPicture(Offset.zero, picture)
    ..pop();

  view.render(sceneBuilder.build());
}

void main() {
  final pd = PlatformDispatcher.instance;
  final implicitView = pd.implicitView;
  if (implicitView == null) {
    throw Exception('No implicit FlutterView available on PlatformDispatcher.');
  }
  view = implicitView;

  pd.onBeginFrame = beginFrame;
  pd.scheduleFrame();
}

Isn't it similar to how we draw things with CustomPainter? Exactly! And this is all we need to draw with Flutter. No widgets at all. It gives us more control over how things work, which is exactly what you want when implementing a more traditional game loop.
At that point, I decided to rewrite my Bunnymark and added a few extra steps. First, I created an abstraction layer for a game-like app:
abstract class Application {
  Future<void> initialize({required CoreView view});

  void onPointer(ui.PointerData data) {}
  void onKeyEvent(KeyEvent event) {}
  void onUpdate(Duration dt) {}
  void onResize(ui.Size size) {}

  void onFrame(Frame frame);
}
Then I created a Core class with initialization logic and a game loop. It also extends BindingBase with a few mixins. This helps us initialize basic platform services that we probably don't want to rewrite from scratch. In general, it looks like this:
final class Core extends BindingBase with SchedulerBinding, ServicesBinding {
  // ...
  Core._({required Application game}) {
    // ...
    ui.PlatformDispatcher.instance.onPointerDataPacket = _onPointerDataPacket;
    HardwareKeyboard.instance.addHandler(_onKeyEvent);
    addPersistentFrameCallback(_onFrame);

    ui.PlatformDispatcher.instance.requestDartPerformanceMode(.latency);
    ui.PlatformDispatcher.instance.onMetricsChanged = () {
      if (_appInitialized) {
        _app.onResize(view.physicalSize / view.devicePixelRatio);
      }
    };

    final core = CoreView(view);
    _app.initialize(view: core).then((_) => _appInitialized = true);

    scheduleFrame();
    // ...
  }

  void _onPointerDataPacket(ui.PointerDataPacket packet) {
    if (_appInitialized) {
      for (final data in packet.data) {
        _app.onPointer(data);
      }
    }
  }

  bool _onKeyEvent(KeyEvent event) {
    if (_appInitialized) {
      _app.onKeyEvent(event);
      return true;
    }
    return false;
  }
}

  void _onFrame(Duration timestamp) {
    // ..
    _app.onUpdate(delta);
    _app.onFrame( /* ... */);
    // ...
    scheduleFrame(); // schedule frames in a loop
  }
}
And finally, a Bunnymark class, which extends the Application class:
final class Bunnymark extends Application {
  @override
  Future<void> initialize({required CoreView view}) async {
    // Load reasources, assets, prepare buffers
  }

  @override
  void onResize(Size size) {
    // React for window resizes
  }

  @override
  void onKeyEvent(KeyEvent event) {
    final isDesktop = kIsWeb || (Platform.isLinux || Platform.isWindows || Platform.isMacOS);
    if (isDesktop && event is KeyDownEvent) {
      if (event.logicalKey == LogicalKeyboardKey.escape) {
        exit(0); // Exit when press escape
      }
    }
  }

  @override
  void onPointer(PointerData data) {
    // Process pointer events
  }

  @override
  void onUpdate(Duration dt) {
    // Calculate bunnies physics
  }

  @override
  void onFrame(Frame frame) {
    // Draw bannies
  }
}
You'll find the full source code at the bottom of the article. Meanwhile, I want to share one more screenshot with you:

Skia, 500k bunnies, and still 60 FPS. But you may notice that while the average frame time is 16ms, the max frame time jumps up to 883ms, which is huge. Unfortunately, this is probably because the GC is doing heavy work, causing random freezes and spikes in frame time. We still need to copy a huge amount of data from Dart to the native side, so… there isn't much more we can improve at this level. Well, actually, we could try to move our batching logic to the C part and interact with it via FFI, but that's a different story.
Also, look what I found:
/// Requests the Dart VM to adjusts the GC heuristics based on the requested `performance_mode`.
///
/// This operation is a no-op of web. The request to change a performance may be ignored by the
/// engine or not resolve in a predictable way.
///
/// See [DartPerformanceMode] for more information on individual performance modes.
ui.PlatformDispatcher.instance.requestDartPerformanceMode(.latency);
I think it helps a bit to use latency mode, but the freezes are still noticeable.
Impeller shows slightly better results in that implementation than with CustomPainter, but after around 190k bunnies, performance drops sharply, and frames start to stutter with visual artifacts as before.
So…
Part 4. Summary?
Well, it's totally fine to use CustomPainter if you want to make games. It is probably performant enough. If you want to go a bit lower-level and do things more traditionally, Flutter allows that too. And I personally like that more. Flutter wasn't built for games, but with the right tricks, it can still surprise you.
Skia outperforms Impeller for me in this particular test. But both are more than enough to create 2D games. Just keep in mind that Skia is limited to 2D, while Impeller can potentially give you 3D capabilities in the future. On the other hand, Impeller is not fully finished yet, and we still have to wait for a fully stable release across all platforms.
And also… be careful with the GC. For games, use pools, caching, and all the other fancy optimization tricks.
And keep in mind that almost any benchmark can be written to show the best-case scenario, while a real project can behave completely differently. So run your own tests and don't rely too much on other people's benchmarks.
That's it! Thank you for reading ;)
Source code: https://github.com/posxposy/flutter_bunnymark
My machine specs: Apple M2 Max, 32GB RAM, macOS 15.6.1.
Tests were done using Flutter 3.38.1, Dart 3.10.0
Share your results with #flutter_bunnymark on social.