Automating the publication of Android applications in Google Play and Huawei AppGallery — from A to Z
This article has been translated from its original publication at https://habr.com/ru/articles/732550/
In this guide, we will explain how to automate the release process of Android applications on Google Play and Huawei AppGallery (currently excluding RuStore). You will forget how to do it manually forever and be able to spend your time on something more useful, saving hundreds of hours per year.
Table of Contents
- Gradle Project Structure
- Android App Bundles (AAB) vs Android Packages (APK)
- Version Number Generation
- Obtaining Access Keys from Google Play
- Uploading Builds to Google Play
- Managing Metadata on Google Play
- Obtaining Access Keys from Huawei AppGallery
- Uploading Builds and Release Notes to Huawei AppGallery
- Adding CI/CD
- Conclusion
Gradle Project Structure
Let's start by organizing the Android project itself. In the project's build.gradle, we use a fairly standard matrix of flavors x buildTypes:
android {
  // <REDACTED>

  flavorDimensions 'default'

  productFlavors {
    google {
      dimension "default"
      versionName = android.defaultConfig.versionName + '-Google'
    }

    huawei {
      dimension "default"
      versionName = android.defaultConfig.versionName + '-Huawei'
    }
  }

  // <REDACTED>

  buildTypes {
    debug {
      applicationIdSuffix '.debug'
      versionNameSuffix '-debug'
      signingConfig signingConfigs.debug
      // <REDACTED>
    }
    beta {
      applicationIdSuffix '.beta'
      versionNameSuffix '-beta'
      signingConfig signingConfigs.release
      // <REDACTED>
    }
    release {
      signingConfig signingConfigs.release
      minifyEnabled true
      shrinkResources true
      // <REDACTED>
    }
}
This matrix provides combinations like GoogleDebug, GoogleBeta, GoogleRelease, HuaweiDebug, and so on. Customization based on stores is not mandatory, but it's useful for managing special features such as in-app. Customize the matrix according to your needs.
Useful links:
- Full example of build.gradle
- Configuring build variants
Android App Bundles (AAB) vs Android Packages (APK)
Since the inception of Android, all applications have been distributed as .apk files, which are essentially ZIP archives containing compiled code and resources for different architectures, localizations, and API levels. You compile your code and resources, package them into an archive, and sign it with your signature. Then you can distribute it through Google Play, RuStore, or simply upload it to a website.
The situation changed in 2021. Google decided it would be good to send only the resources that correspond to the application's API level and architecture to clients on Google Play. After all, why send armeabi-v7a libraries for arm64-v8a devices? Why would devices with API level = 31 need compatibility files for API level = 21? Why include localizations in 30 languages when there's only one in the system? Overall, the idea is good, but there are nuances.
To make all this work, Google introduced a new intermediate format called Android App Bundles (.aab). Similar to .apk files, you compile and sign .aab files with your own key. However, .aab files cannot be directly installed on devices. Google Play creates an .apk file with the necessary resources from the .aab file for each specific device and sends it to the device. Instead of downloading a 50 MB .apk file, you download a targeted 20 MB .apk file specifically built for your device. Profit!
Important! When using Android App Bundles, the final build and APK signing will be handled by Google (and now Huawei as well). Each app store uses its own keys for signing. Google has its keys, Huawei has its keys. Android operates in such a way that installing a new version of an application signed with a different key is not possible without uninstalling the previous version along with all its data. If your users install a bundle application from Google Play, they won't be able to update it through Huawei.
The classic approach with APKs does not have this problem. However, starting from August 2021, you no longer have a choice, and all new applications must be uploaded in the .aab format, leaving the signing process to Google Play. Now you can forget about split APKs, APK expansion files, and other workarounds. Users won't have to download unnecessary megabytes over fast EDGE^W5G internet. More free space on the device! And ultimately, there's almost no possibility to switch from Google Play to alternative stores for such applications. Win-win-win.
Useful links:
Version Number Generation
The first and one of the most important tasks to accomplish for implementing continuous deployment, whether for an online service or package software, is to ensure a deterministic version number generation algorithm. The requirement is simple: there should be a unique version number for each git commit in the release branch. Stop manually bumping versions (1.0.2 -> 1.0.3 -> 1.0.4, and so on) every time. You need a system where the version number (at least its latest .patch-level component) is generated automatically.
There are two good approaches that allow you to solve this issue once and for all.
Approach 1: Using git describe
One characteristic of Android (and Google Play and AppGallery, respectively) is that downgrading application versions is not possible. The version number should always increase. However, the git history of the release branch also always grows if you're not messing around with history rewrites and force-pushes.
It makes sense to use the number of git commits in the branch for numbering. For example, you can periodically create an annotated tag like v$major.$minor (e.g., v1.0, v2.0), while the third component (patch) is generated as the number of commits from the previous tag.
To implement this, it's most convenient to use the command git describe --long:

This approach provides a valid semver v1.0.0, v1.0.1, v1.0.2, and so on, where the last digit of the version (patch) is assigned automatically, while the major.minor is controlled by you. Each git commit will have a unique version number. Finding a git commit based on a tag and the number of commits from it is also straightforward. Simple and practical.
Approach 2. Using Dates
A more radical approach is to use the date of the git commit as the version. For example, 2023.04.23-2. But what about semver, you may ask? Well, why do you need it in the world of Android applications when you have continuous app updates from Google Play and no way to roll back or provide multiple versions? You can argue about this in the comments if you wish.
In git, there are two typeds of dates:
- Author Date: What the author specified and what you can see in git log and git show. It can be as far in the past as you like, especially if you merge some year-old pull request.
- Commit Date: The date when the commit was added to the branch. It usually corresponds to the actual time when the merge happened in the branch. Time always moves forward, and Commit Date is no exception unless you intentionally experiment with your clock settings.
We will use the Commit Date, which can be obtained using the %cd formatting in git log:

2023-04-23 10:37:01 +0000
2023-04-23 09:02:18 +0000
2023-04-19 14:43:21 +0000
2023-04-19 14:43:21 +0000
2023-04-19 01:39:03 +0000
<REDACTED>
One date is not enough unless you want to limit yourself to one commit per day. As an additional number, we will consider the number of commits since the beginning of the day. We will get something like 2023.04.23-1, 2023.04.23-3, 2023.04.23-4, and so on. You can also take the hour multiplied by 60 plus minutes or simply the hour (up to you) as the last digit. But the option with the number of commits since the beginning of the day seemed to be a practical choice for us.
Don't forget that ultimately all of this needs to be inserted into the versionCode, which is limited to the range 0-2_100_000_000 (slightly less than 31 bits). Version Code is what Android and stores use for versioning, while Version Name is simply a text string where you can put anything you want to show the user.
To generate the version, we will use the following code in Gradle (pay attention to the comments):
def getVersion() {
  def time = Integer.parseInt(run(['git', 'log', '-1', '--format=%ct']).trim())
  def cal = Calendar.getInstance(TimeZone.getTimeZone("UTC"), Locale.ENGLISH)
  cal.setTimeInMillis((long) time * 1000)
  def year = cal.get(Calendar.YEAR)
  def month = cal.get(Calendar.MONTH) + 1
  def day = cal.get(Calendar.DAY_OF_MONTH)
  def date_of_last_commit = String.format("%04d-%02d-%02d", year, month, day)
  def build = Integer.parseInt(run(['git', 'rev-list', '--count', '--after="' + date_of_last_commit + 'T00:00:00Z"', 'HEAD']).trim())

  // Use the last git commit date to generate the version code:
  // RR_yy_MM_dd_CC
  // - RR - reserved to identify special markets, max value is 21.
  // - yy - year
  // - MM - month
  // - dd - day
  // - CC - the number of commits from the current day
  // 21_00_00_00_00 is the the greatest value Google Play allows for versionCode.
  // See https://developer.android.com/studio/publish/versioning for details.
  def versionCode = (year - 2000) * 1_00_00_00 + month * 1_00_00 + day * 1_00 + build

  // Use the current date to generate the version name:
  // 2021.04.11-12-Google (-Google added by flavor)
  def versionName = String.format("%04d.%02d.%02d-%d", year, month, day, build)

  return new Tuple2(versionCode, versionName)
 }
Next, set the versionCode and versionName from the result of calling getVersion():

You can ensure that each Gradle run will generate a unique version number for each git commit. This approach solves the versioning issue once and for all, so you don't have to worry about it.
Obtaining Access Keys from Google Play
To automate uploading to Google Play, you need to first obtain access keys for the API. It seems that Google Play has tightly integrated with IAM Google Cloud, and you need to create a new Service Account with the necessary permissions and obtain a .json file with credentials. But let's go step by step.
Step 1: Linking Google Play Developer Account to Google Cloud Project
It seems that new Google Play Developer Accounts need to be linked to Google Cloud in a somewhat semi-magical way, especially if you have used Firebase.
Go to Google Play Console -> Setup -> API Access. If you already have a Linked Project, then you're good to go and can move on to the next step. If not, check in the Google Cloud Console to see what projects you already have and create a new one if necessary. Firebase implicitly creates a Google Cloud project, and you can use the same one.

Step 2: Creating a Google Service Account
A Service Account is an entity for "robots" that has credentials and can be assigned roles and access rights. It is recommended to use a robot Service Account rather than your own human Google Account.
Click on "View in Google Cloud Platform" or simply go to the Google Cloud Console and select the desired project from the list. Go to the "Service Accounts" section. Click on "Create Service Account".

Enter a name for the Service Account, for example, "Google Play Automatic Upload". Enter an ID (email) for the Service Account, for example, "google-play-uploaded". Click "CREATE AND CONTINUE".

Add the "Viewer" role; without it, the Service Account cannot be added to the Google Play Console. Click "DONE", skipping the third step ("Grant users access to this service account (optional)").

Step 3: Obtaining the Access Key Click on the newly created Service Account.
Go to the "Keys" tab. Click the "ADD KEY" button -> "Create new" -> JSON.

After clicking "CREATE," a JSON file with the Service Account's private key will be downloaded:
{
  "type": "service_account",
  "project_id": "<YOUR GCLOUD PROJECT>",
  "private_key_id": "<REDACTED>",
  "private_key": "-----BEGIN PRIVATE KEY-----\n<REDACTED>\n-----END PRIVATE KEY-----\n",
  "client_email": "google-play-uploaded@<YOUR GCLOUD PROJECT>.iam.gserviceaccount.com",
  "client_id": "<SOME BIG NUMBER>",
  "auth_uri": "https://accounts.google.com/o/oauth2/auth",
  "token_uri": "https://oauth2.googleapis.com/token",
  "auth_provider_x509_cert_url": "https://www.googleapis.com/oauth2/v1/certs",
  "client_x509_cert_url": "https://www.googleapis.com/robot/v1/metadata/x509/google-play%40<YOUR GCLOUD PROJECT>.iam.gserviceaccount.com"
Keep this key in a secure and confidential location!
Step 4: Adding the Google Cloud Service Account to the Google Play Console
The final step is to grant upload permissions for the new Service Account. It seems that this part is not fully integrated with Google Cloud yet, and the permissions need to be granted in the Google Play Console.
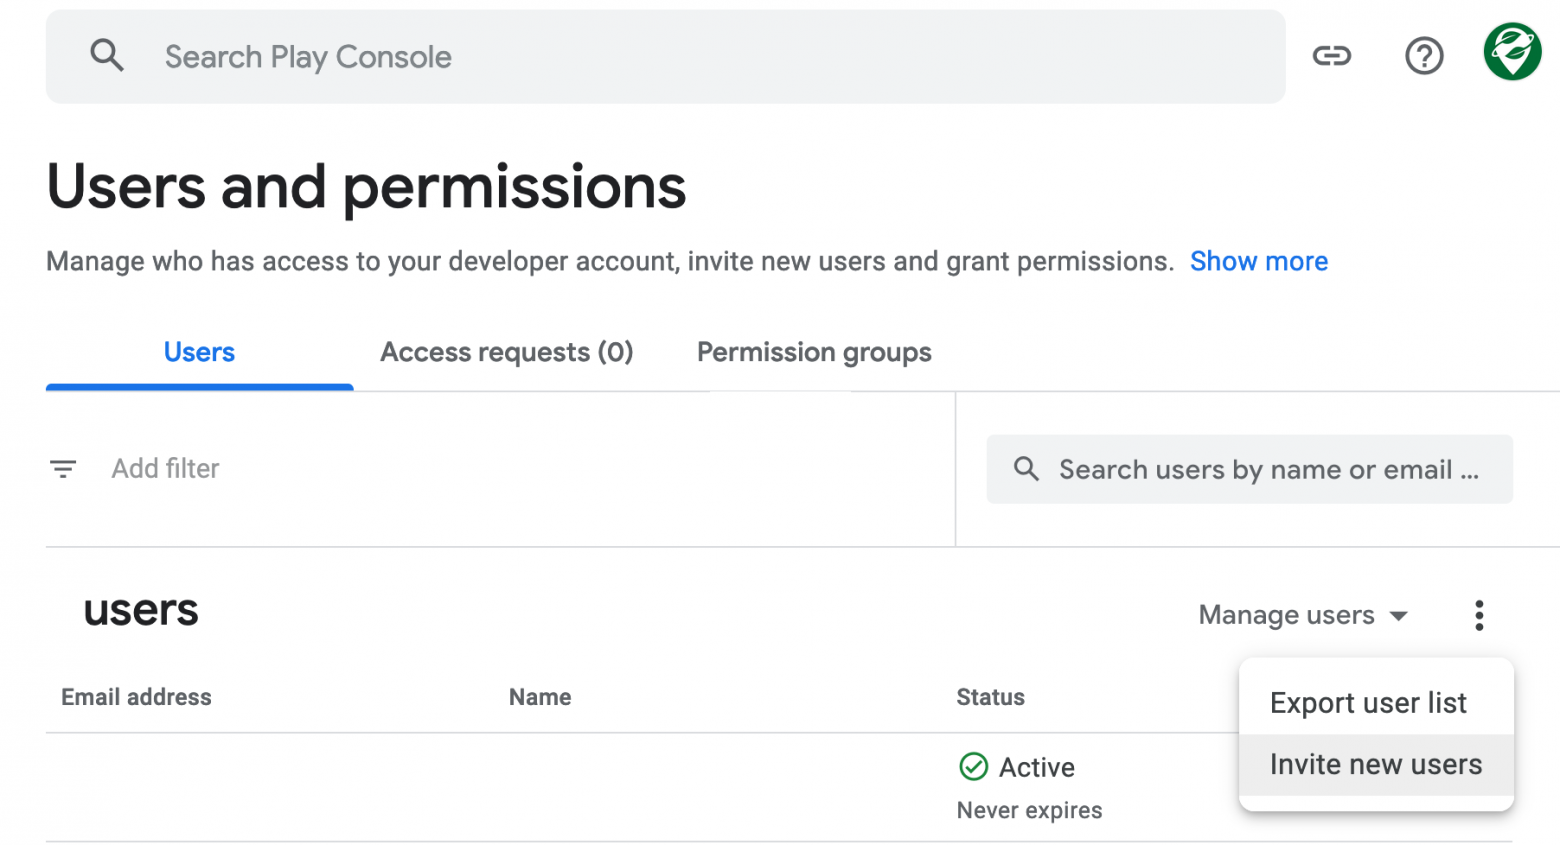
Go to the Google Play Console, navigate to the "Users and permissions" section. Click on the menu with three dots, then select "Invite new users."
Enter google-play-uploaded@<YOUR GCLOUD PROJECT>.iam.gserviceaccount.com

The following permissions need to be granted:
- View app information and download bulk reports (read only):
Users with this permission can view app information, including any associated Play Games services projects, without access to financial data. They can also download bulk reports and view any new apps added to the Play Console in the future.
- Create, edit, and delete draft apps:
This permission allows users to create, edit, and delete draft apps but does not grant the ability to publish apps on Google Play.
- Release to production, exclude devices, and use Play app signing:
Users with this permission can create, edit, and roll out releases to production, unpublish and republish apps, exclude devices in the device catalog, and utilize app signing by Google Play to sign APKs. They can publish apps to users on Google Play.
- Release apps to testing tracks:
This permission allows users to upload draft apps, create, edit, and roll out releases to testing tracks, unpublish and republish apps published to a testing track, upload and modify .obb files, edit release notes for apps that are not active in production, and upload app bundles for internal sharing. It does not grant the ability to publish apps to production on Google Play.
Done. By following the instructions in this section, you should have obtained a .json file with credentials for accessing Google Play, enabling you to upload applications.
Useful links:
Uploading Builds to Google Play
We will use the Triple-T Gradle Play Publisher plugin for Gradle to upload to Google Play. An alternative is the well-known Fastlane, which we also use but only for iOS. Triple-T Play Publisher is subjectively more convenient, at least due to its integration with Gradle and the absence of the need to deal with a bunch of Ruby dependencies.
Adding the Library Add the following Gradle plugin to your build.gradle: com.github.triplet.gradle:play-publisher:

The version in the article will quickly become outdated. Please always use the latest available version.
Adding the plugin invocation
Add the plugin invocation com.github.triplet.play to your build.gradle immediately after the android {} section:

Plugin Configuration
The plugin is configured through the global play {} configuration section, as well as individually for each flavor:

- track: Specifies the track to upload to. Of course, we want to upload directly to production!
- userFraction: Enables staged rollout to 10% to avoid being too aggressive.
- defaultToAppBundles: Enables Android App Bundles (AAB) instead of Android Packages (APK).
- releaseStatus.set(ReleaseStatus.DRAFT): Creates a draft version but doesn't submit it for review immediately. It can be changed to ReleaseStatus.IN_PROGRESS after testing.
Are you currently doing a staged rollout? Please share your experience in the comments.
Testing the upload to Google Play
We launch the bundleGoogleRelease task to build a release version of the aab application for subsequent uploading.
gradle bundleGoogleRelease
We check to see if something has actually been built.
ls build/outputs/bundle/googleRelease
OrganicMaps-23043001-google-release.aab
We launch the publishGoogleReleaseBundle task to upload the compiled aab to Google Play.
gradle publishGoogleReleaseBundle
> Task :publishGoogleReleaseBundle
Starting App Bundle upload: OrganicMaps-23043001-google-release.aab
Uploading App Bundle: 10% complete
Uploading App Bundle: 19% complete
Uploading App Bundle: 29% complete
Uploading App Bundle: 39% complete
Uploading App Bundle: 49% complete
Uploading App Bundle: 58% complete
Uploading App Bundle: 68% complete
Uploading App Bundle: 78% complete
Uploading App Bundle: 88% complete
Uploading App Bundle: 97% complete
App Bundle upload complete
Updating [completed, inProgress] release (app.organicmaps:[23030505, 23040207]) in track 'production'
In general, the uploading part is ready, and you can see the draft release in the Google Play Console and submit it for review.

If everything meets the expectations, then you can change
releaseStatus.set (ReleaseStatus.DRAFT) to
releaseStatus.set(ReleaseStatus.IN_PROGRESS) to avoid having to go to the Google Play Console to press the button again. The button should be somewhere in your CI/CD so that you don't have to use it there.
Useful links:
Managing Google Play metadata
Next step is to learn how to update metadata (app description, screenshots, etc.) in Google Play. Once you've automated this, it will be possible to update metadata in your Git repository instead of Google Play. The plugin will handle the updates in Google Play.
Downloading metadata from Google Play
First, you need to download the existing metadata from Google Play to your repository. Run the bootstrapGoogleReleaseListing task to do this.
gradlew bootstrapGoogleReleaseListing
After shuffling the disk, Gradle will download all current metadata to the repository.
> Configure project :
Building with Google Mobile Services
Building without Google Firebase Services
Version: 2023.04.23-2
VersionCode: 23042302
Building for [armeabi-v7a, arm64-v8a, x86_64] archs.
Create separate apks: false

> Task :bootstrapGoogleReleaseListing
Downloading app details
Downloading listings
Downloading in-app products
Downloading release notes
Downloading en-US listing
Downloading tr-TR listing
<REDACTED>

Downloading en-US listing graphics for type 'featureGraphic'
Downloading en-US listing graphics for type 'icon'
Downloading en-US listing graphics for type 'phoneScreenshots'
Downloading en-US listing graphics for type 'tenInchScreenshots'
Downloading en-US listing graphics for type 'sevenInchScreenshots'
Downloading tr-TR listing graphics for type 'sevenInchScreenshots'
Downloading tr-TR listing graphics for type 'phoneScreenshots'
<-<----<
BUILD SUCCESSFUL in 44s
1 actionable task: 1 executed
New files will appear in src/<FLAVOR>/play:
contact-email.txt
contact-website.txt
default-language.txt
listings/
  en-US
    full-description.txt
    graphics/
      icon/
        1.png
      phone-screenshots/
        1.jpg
        2.jpg
        3.jpg
        4.jpg
    release-notes.txt
    short-description.txt
    title.txt
    video-url.txt
release-notes/
  en-US/
    default.txt
Editing data
After downloading the data from Google Play, add it to Git and then use Git as the primary source, avoiding manual actions in the Google Play Console. This provides many benefits, starting with clear versioning and the ability to add translation tools. For example, we use Weblate to translate Google Play descriptions into other languages. The Google Play data will also be reused later for the Huawei AppGallery.
Uploading metadata to Google Play
To upload updated metadata back to Google Play, there is a task called publishGoogleReleaseListing (where GoogleRelease is your flavor):
./gradlew publishGoogleReleaseListing

<REDACTED>

> Configure project :
Building with Google Mobile Services
Building without Google Firebase Services
Version: 2023.05.01-1
VersionCode: 23050101
Building for [armeabi-v7a, arm64-v8a, x86_64] archs.
Create separate apks: false

> Task :publishGoogleReleaseListing
Uploading app details
Uploading ar listing
<REDACTED>
Uploading zh-TW listing
Important. Updating metadata in Google Play is not tied to releasing releases. You can update descriptions and app screenshots at any time, regardless of the current state of the app build review. Review of metadata changes is done separately!

We use this approach to update data in all 59 languages supported by the Google Play Console at the time of writing.
Useful links:
Getting Access Keys from Huawei AppGallery
To upload something to the Huawei AppGallery, we first need to get access keys to Huawei AppGallery Connect. The Huawei AppGallery Connect interface, let's say, is sometimes quite confusing. But you need to figure it out once so that you don't have to go there anymore.
Go to AppGallery Connect and click Users and permissions. Go to API key > Connect API and click Create:

You can enter any name. Specify the following roles:
- Development
- Operations
- Customer service (will be selected automatically)

"After this, you will be able to download the .json access key to Huawei AppGallery Connect:
{
        "type":"team_client_id",
        "developer_id":"<BIG NUMBER>",
        "client_id":"<ANOTHER BIG NUMBER>",
        "client_secret":"<REDACATED>",
        "configuration_version":"3.0"
}
Done. This file will be needed in the next step to automate the upload.
Useful links:
- AppGallery Connect -> Getting Started -> Creating an API client
- Huawei App Gallery Publishing Documentation
Uploading builds and release notes to Huawei AppGallery
To automate uploading to Huawei AppGallery, we will use the Gradle plugin ru.cian:huawei-publish-gradle-plugin, developed by Aleksandr Mirko from Omsk. Let's thank Aleksandr for such a wonderful alternative plugin for uploading to Huawei AppGallery, without which we would have suffered.
Adding the plugin to Gradle
Add the Gradle-plugin ru.cian:huawei-publish-gradle-plugin to build.gradle:
buildscript {
  repositories {
    google()
    mavenCentral()
  }

  // <REDACTED>

  dependencies {
    classpath 'com.android.tools.build:gradle:7.4.2'

    // <REDACTED>

    classpath("ru.cian:huawei-publish-gradle-plugin:1.3.6")
  }
}
Enabling the plugin
Enable the ru.cian.huawei-publish-gradle-plugin plugin in build.gradle after the android {} section:
apply plugin: 'ru.cian.huawei-publish-gradle-plugin'
Plugin configuration
The plugin has a separate section for configuring huaweiPublish {}. Add a new section with settings to the end of build.gradle:
huaweiPublish {
  instances {
    huaweiRelease {
      credentialsPath = "$rootDir/huawei-appgallery.json"
      buildFormat = 'aab'
      deployType = 'draft' // confirm manually
      releaseNotes = []
      def localeOverride = [
          'am' : 'am-ET',
          'gu': 'gu_IN',
          'iw-IL': 'he_IL',
          'kn-IN': 'kn_IN',
          'ml-IN': 'ml_IN',
          'mn-MN': 'mn_MN',
          'mr-IN': 'mr_IN',
          'ta-IN': 'ta_IN',
          'te-IN': 'te_IN',
      ]
      def files = fileTree(dir: "$projectDir/src/google/play/listings",
          include: '**/release-notes.txt')
      files.each { File file ->
        def path = file.getPath()
        def locale = file.parentFile.getName()
        locale = localeOverride.get(locale, locale)
        releaseNotes.add(new ru.cian.huawei.publish.ReleaseNote(locale, path))
      }
    }
  }
}
- credentialsPath - sets the path to the file with keys from AppGallery Connect
- deployType = 'draft' - tell the plugin to create a release draft, but not to send it for review immediately. After testing and debugging, it can be changed to publish.
- buildFormat = 'aab' - just like in Google Play, we use Android App Bundles (AAB) for Huawei AppGallery instead of Android Packages (APK).
- localeOverride - here and below, magic is done to reuse the release notes from the plugin for Google Play. There are some minor inconveniences due to the fact that a small group of locale codes for Huawei AppGallery is written with _ (underscore) instead of - (dash) like Google Play. The rest match.
For more information on configuration parameters, see the plugin README on GitHub.
Testing the upload
Run the bundleHuaweiRelease task to build a release version of the aab application for subsequent upload:
gradle bundleHuaweiRelease
Make sure that we have actually built something:
ls build/outputs/bundle/huaweiRelease
OrganicMaps-23043001-huawei-release.aab
Run the publishHuaweiAppGalleryHuaweiRelease task to upload the assembled aab to Huawei AppGallery Connect:"
gradle publishHuaweiAppGalleryHuaweiRelease
Attention: the publish task for some reason does not have an explicit dependency on the bundle, so do not forget to run the bundle task every time. You can run both commands at once in one gradle run:
gradle bundleHuaweiRelease publishHuaweiAppGalleryHuaweiRelease
Pay attention to what gradle says during the upload process:
> Task :publishHuaweiAppGalleryHuaweiRelease
Huawei AppGallery Publishing API: Prepare input config
Huawei AppGallery Publishing API: Found build file: `OrganicMaps-23043001-huawei-release.aab`
Huawei AppGallery Publishing API: Get Access Token
Huawei AppGallery Publishing API: Get App ID
Huawei AppGallery Publishing API: Get Upload Url
Huawei AppGallery Publishing API: Upload build file '/home/runner/work/organicmaps/organicmaps/android/build/outputs/bundle/huaweiRelease/OrganicMaps-23040207-huawei-release.aab'
Huawei AppGallery Publishing API: Upload release notes: 1/59, lang=et
Huawei AppGallery Publishing API: Upload release notes: 2/59, lang=kk

[REDACTED]

Huawei AppGallery Publishing API: Upload release notes: 59/59, lang=ar
Huawei AppGallery Publishing API: Update App File Info
Huawei AppGallery Publishing API: Upload build file draft without submit on users - Successfully Done!

BUILD SUCCESSFUL in 1m 36s
1 actionable task: 1 executed
In case of any problems with credentials in the huawei-appgallery.json file, the plugin will fail at the "Get Access Token" stage.

There may also be situations where the number of characters in the release notes exceeds the limits, which results in creating a draft without fully updating the release notes. In this case, it is better to fix the problem, manually delete the draft release in AppGallery Connect, and try again. In this example, we upload release notes for almost all available localizations, although in most cases the text is simply the same as in English.


Done. After this step, uploading to Huawei AppGallery is also possible through Gradle.
Useful links:
Adding CI/CD
The last but not the least step is to add all of the above to your CI/CD system. There are no special difficulties, as all automation is already done in gradle and you just need to run the corresponding tasks.
We use GitHub Actions, so we'll briefly explain them.
First, you will need to add files with keys google-play.json and huawei-appgallery.json to GitHub Actions Secrets. You will also need signing keys, which can be saved in base64. Go to Settings -> Secrets and variables -> Actions and add two new variables for each file:

Then create a new workflow file .github/workflows/android-release.yaml:
name: Android Release
on:
  workflow_dispatch:  # Manual trigger
Add one task with a matrix of several options (google, huawei, web):
jobs:
  android-release:
    name: Android Release
    runs-on: ubuntu-latest
    environment: production
    needs: tag
    strategy:
      fail-fast: false
      matrix:
        include:
          - flavor: google
          - flavor: huawei
Download the sources:
 steps:
      - name: Checkout sources
        uses: actions/checkout@v3
        with:
          fetch-depth: 200 # enough to get all commits for the current day
In case of shared GitHub Runners, all dependencies such as Android SDK are already installed, but you can install something else necessary for your project:
 - name: Install build tools and dependencies
        shell: bash
        run: |
          sudo apt-get update -y
          sudo apt-get install -y ninja-build
Create the google-play.json and huawei-appgallery.json files from GitHub Secrets:
- name: Get credenials
        shell: bash
        run: |
          echo "${{ secrets.GOOGLE_PLAY_JSON }}" > google-play.json
          echo "${{ secrets.HUAWEI_APPGALLERY_JSON }}" > huawei-appgallery.json
Similarly, you will need to add signing keys for applications and other keys. Instead of working with individual secrets, you can create a separate repository and apply it on top of the main one at the time of application building.
Add tasks for building and uploading to Google Play and Huawei AppGallery using the instructions described earlier in this article:
- name: Compile and upload to Google Play
        shell: bash
        working-directory: android
        run: |
          gradle bundleGoogleRelease publishGoogleReleaseBundle
        if: ${{ matrix.flavor == 'google' }}

      - name: Compile and upload to Huawei AppGallery
        shell: bash
        working-directory: android
        run: |
          gradle bundleHuaweiRelease
          gradle publishHuaweiAppGalleryHuaweiRelease
        if: ${{ matrix.flavor == 'huawei' }}
In general, it's done. When you run it, it will look something like this:

You can also add a task to update the metadata of the Google Play Store. You can add a task to the same workflow file or create a separate file, as in Google Play this operation.
 - name: Update Google Play Metadata
        shell: bash
        run: ./gradlew publishGoogleReleaseListing
        working-directory: android
        timeout-minutes: 5
Useful links
Conclusion
Issuing new releases in stores is a routine operation that needs to be done periodically - every week, every month, year after year. And at every step, something will be forgotten or done with errors. Release after release. You will spend your time every time.
Before adding the automation described in the article, we carefully documented the existing process. It turned out to be more than 30 pages of text with screenshots... Configured CI/CD has been working for two years already and allows saving hundreds of hours per year, which can be spent on more useful things.