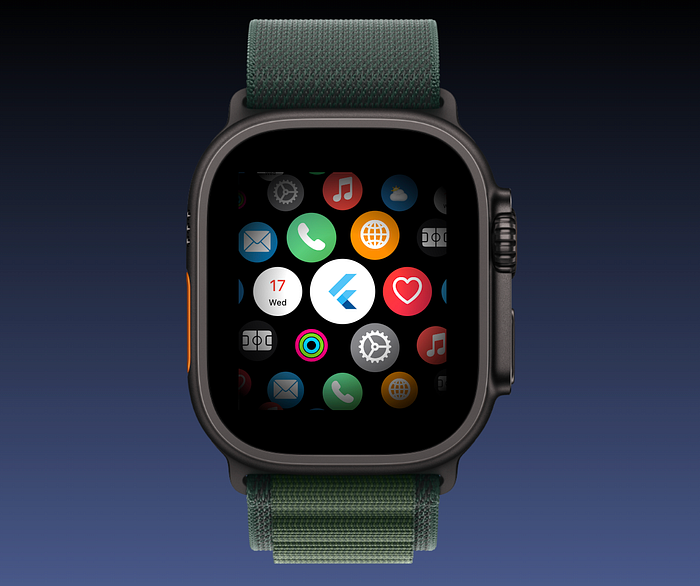
Apple Watch Companion for Flutter Apps
FlutterPulseThis article was translated specially for the channel FlutterPulseYou'll find lots of interesting things related to Flutter on this channel. Don't hesitate to subscribe!🚀
Learn how to add an Apple Watch Companion App to your Flutter Apps Covering how to share data between Flutter on the Phone and the Watch
At Fluttercon Europe 2025 I gave a talk on how to build a companion app for Apple Watch for a Flutter App. You can find the recording and the slides. If you want to get straight to a code example you can find an example app.
In this Article I will go through the necessary setup steps, how to share data and how to display data from your Flutter App in an Apple Watch App.
Adding an Apple Watch App
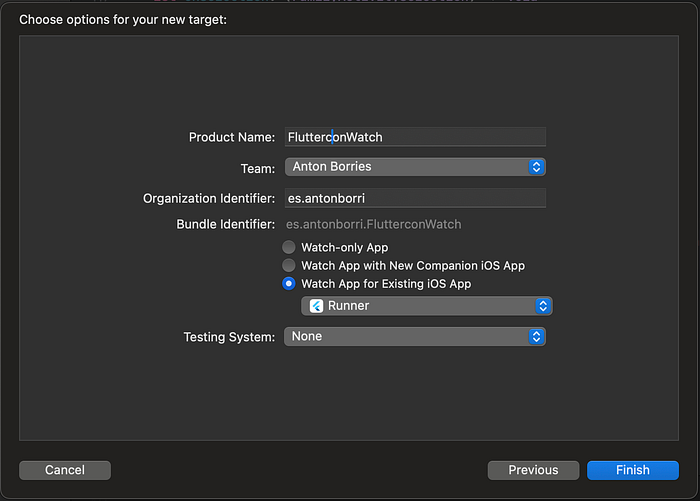
In order to get started with adding a watch App open Xcode and go : File > New > Target > watchOS > App and fill out the metadata ensuring you select Watch App for Existing iOS App and selecting your Flutter Runner App


WatchConnectivity
When you now run your App on an iPhone you can see your App available for installation in the Watch App on your phone. However simply having the companion app is not really what we want. We want to share data between the apps on the phone and the watch.
Ever since watchOS 2 (which was released in 2015) you need to use WatchConnectivity. While the API has changed in some ways, the basic concept is still centered around having a WCSession and a WCSessionDelegate. How it works is to connect a SessionDelegate to a session from both the phone app as well as the watch app.
Of course you could wrap the native APIs yourself to make sure your Flutter app can connect to the session. However you can also use the great Flutter Community and use packages from pub.dev where someone may already have wrapped it. In the case of Watch Connectivity there are actually multiple plugins already for this. For the remainder of this article I will be using the package flutter_watch_os_connectivity
Connecting to the Session from Flutter
Using the plugin it is actually super easy to connect and activate the session.
final watchConnectivity = FlutterWatchOsConnectivity();
await watchConnectivity.configureAndActivateSession()
That's it. Your flutter app is connected to a WatchSession. The plugin also offers callbacks like getActivateState for checking the session state, getPairedDeviceInfo for checking if a watch is currently paired and getReachability to check if the watch app is currently paired/reachable. All of these functions also offer listening to changes via a standard Dart Stream
Session Delegate on the Watch
As mentioned the session also needs to be connected to from the watch app.
To do that add a new Swift File to create the delegate. And add the following code:
class FlutterWatchDelegate: NSObject, WCSessionDelegate {
  override init() {
    super.init()
    // Get the default session
    let session = WCSession.default
    // Set this instance as the delgate
    session.delegate = self
    // Activate the session
    session.activate()
  }

  func session(
    _ session: WCSession, activationDidCompleteWith activationState: WCSessionActivationState,
    error: (any Error)?
  ) {
    print("Activation Completed: \(session.activationState)")
    // Once connected you can initiate with initial data
  }
}
To use the delegate (and have the initialization logic called), add it as a variable in your watch app
@main
struct FlutterAppleWatchApp: App {
var delegate: FlutterWatchDelegate = FlutterWatchDelegate()

  var body: some Scene {
    WindowGroup {
      ContentView()
    }
  }
}
Share Data
There are multiple ways of sharing data between the phone app and the watch app.
Shared Application Context
Apple provides a way of having a shared application context which is a key‑value store between the apps on both phone and watch. Especially useful if you want to update data while not both apps are open at the same time.
Sending Data from Flutter to the Watch
The plugin offers a way to simply send a Map<String, dynamic> from Flutter to the Application Context.
final data = <String, dynamic>{'key': value};
await watchConnectivity.updateApplicationContext(data);
Receive Data on the Watch
The WCSessionDelegate has a function you can override which will get called when the ApplicationContext is updated.
class FlutterWatchDelegate: NSObject, WCSessionDelegate {
  // ...
  var myData: Int = 0

  // Override didReceiveApplicationContext to be called when the context gets updated
  func session(_ session: WCSession, didReceiveApplicationContext applicationContext: [String: Any]) {
    myData = applicationContext["key"] as Int?
  }
}
When the session is first activated you can also use the session to get the current application context as well.
func session(
  _ session: WCSession, activationDidCompleteWith activationState: WCSessionActivationState,
  error: (any Error)?
) {
  print("[WATCH] Activation Completed: \(session.activationState)")
  if session.activationState == WCSessionActivationState.activated {
    let initialContext = session.applicationContext
    // Use the context for what you need it
  }
}
Send Data from the Watch to Flutter
Sending Data the other way around is quite straightforward. In order to update the application context the other way around you can simply call updateApplicationContext on the session like this:
func updateData(value: Any?) {
  try? WCSession.default.updateApplicationContext(["key": value])
}
Receive Data from the Watch in Flutter
The plugin offers a way to get the applicationContext in Flutter both as a Future and a Stream
// As Future
final receivedContext = await watchConnectivity.getApplicationContext();

// Updates as a Stream
final updates = watchConnectivity.applicationContextUpdated
    .listen((applicationContext) {
      // Handle updates
    });
Note that the received object has a currentContext and a receivedContext. This mirrors the underlying structure in the Swift API. This can get slightly confusing, especially when both the phone and the watch app are open at the same time and sending data both ways. So especially in these cases you should opt for different data exchange approaches.
For more details on the shared application context check out the Apple Documentation.
Sending Messages
One other ways for sharing data is sending messages in the form of Map<String, dynamic> around the two apps. Note that before sending you should check that the counterpart app is reachable . The syntax to use it so send receive messages is quite similar to sending application context
// Send Message from Flutter to Apple Watch
final messageData = <String, dynamic>{};
await watchConnectivity.sendMessage(messageData);

// Receive Data in Stream
watchConnectivity.messageReceived.listen((message) async {
    /// New message is received, you can read it data map
    receivedMessageData = message.data;
});
Check out the plugin's documentation on more Info and also on how to reply to messages
On the Apple Watch Site sending/receiving messages is also quite similar
// Override in Delegate for receiving messages
func session(
    _ session: WCSession,
    didReceiveMessage message: [String : Any]
) {
  // Handle received Message
}

// Sending Messages
func sendMessage(message: [String : Any]) {
  try? WCSession.default.sendMessage(message)
}
Check the Apple Documentation for more Info on sending Messages and receiving messages.
User Info
User Info is yet another way in which Apple allows you to send data as a Map<String, dynamic>. The main difference here is that Apple has slightly different rules on how receiving UserInfo can notify a backgrounded app, making User Info the prime candidate for using it to send data for complications. As a heads up I will write a follow up article on the topic of connecting Flutter with and Apple Watch App and Complications in another article so be sure to follow me for updates when this is out.
Sending Data works again quite similarly
await watchConnectivity.transferUserInfo({
    "key": "value"
});
Note: You may be tempted to use the parameter isComplication when you want to send data for a complication, however the underlying technology is not (yet) supported after apple switched complications to WidgetKit. However in my experiments updating the complication also worked without this. More on this in the follow up article
Receiving data from the watch is similarly done by overriding the respective function on the delegate. More Info again in Apple's Documentation
func session(_ session: WCSession, didReceiveUserInfo userInfo: [String: Any] = [:]) {
  // Handle user Info for Complication
}
Files
WatchOS Connectivity also offers transferring files between platforms. This can be used to e.g send a screenshot of a Flutter Widget to display that on the watch (e.g your hero graphics) or also to transfer database files or backend responses. Sending a file is again following the other methods.
final baseDirectory = await getApplicationSupportDirectory();
final file = File('${baseDirectory.path}/$myData.json');
final transfer = await watchConnectivity.transferFileInfo(file);

transfer?.setOnProgressListener((progress) {
  debugPrint('Progress: ${progress.currentProgress}');
});
Note that when receiving a File, this File is only available during the respective function invocation in the Watch App Delegate. So, in order to not lose it, you need to store it in the app's document directory and use that copy when using the file outside of the function.
func session(_ session: WCSession, didReceive file: WCSessionFile) {
  let sourceURL = file.fileURL
  let fileManager = FileManager.default
  let documentsURL = fileManager.urls(for: .documentDirectory, in: .userDomainMask)[0]
  let destinationURL = documentsURL.appendingPathComponent(sourceURL.lastPathComponent)

  try? fileManager.moveItem(at: sourceURL, to: destinationURL)

  useFile()
}
To read the file e.g when the App connects to the session on the phone you can do something like:
func session(
  _ session: WCSession, activationDidCompleteWith activationState: WCSessionActivationState,
  error: (any Error)?
) {
  if session.activationState == WCSessionActivationState.activated {
    checkFile()
  }
}

var fileUrl : Url?


func checkFile() {
  let fileManager = FileManager.default
  let documentsURL = fileManager.urls(for: .documentDirectory, in: .userDomainMask)[0]
  let imageUrl = documentsURL.appendingPathComponent("myImage.png")

  if fileManager.fileExists(atPath: imageUrl.path()) {
    // File exists
    fileUrl = imageUrl
  } else {
    // File does not exist
    fileUrl = nil
  }
}
Display Data from Flutter in the Apple Watch App
So now that we have covered how to send data. Displaying data and updating the UI can be quite easy as well using the built-in state management solutions from SwiftUI. We can use the @Observable and @State annotation to automatically pass updates down to the UI Layer.
Observing the SessionDelegate
By using the @Observable annotation on the FlutterWatchDelegate it can get updates whenever a variable (in the example case the count changes)
// Mark as Observable for updates
@Observable
class FlutterWatchDelegate: NSObject, WCSessionDelegate {

  // Count variable
  var count: Int = 0

  override init() {
    super.init()
    let session = WCSession.default
    session.delegate = self
    session.activate()
  }

  func session(
    _ session: WCSession, activationDidCompleteWith activationState: WCSessionActivationState,
    error: (any Error)?
  ) {
    if session.activationState == WCSessionActivationState.activated {
      // Get initial count
      updateCount(applicationContext: session.applicationContext)
    }
  }

  // Update Count when new application context is received
  func session(_ session: WCSession, didReceiveApplicationContext applicationContext: [String: Any])
  {
    updateCount(applicationContext: applicationContext)
  }

  func updateCount(applicationContext: [String: Any]) {
    if let newCount = applicationContext["count"] as? Int {
      count = newCount
    }
  }
}
Using the delegate as State
Now that the FlutterWatchDelegate can be observed we can use it in the Watch Application to automatically receive updates
@main
struct FlutterAppleWatchApp: App {
  @State var delegate: FlutterWatchDelegate = FlutterWatchDelegate()

  var body: some Scene {
    WindowGroup {
      ContentView(
        delegate: delegate
      )
    }
  }
}
Using and displaying the data
Passing down the delegate to the View we can rebuild the ui with the value.
struct ContentView: View {
  let delegate: FlutterWatchDelegate

  var body: some View {
    List {
      // Using the count from the delegate
      // .description is the Swift equivalent of toString()
      Text(delegate.count.description)
      Button(
        "Increment",
        action: delegate.incrementCounter
      )
    }
  }
}
As you can see in the example above we call an incrementCounter method on the delegate. This is an easy way to enable two way data transfers as described in the previous section.
The respective method on the delegate may look something like this
func incrementCounter() {
  count = count + 1

  try? WCSession.default.updateApplicationContext(["count": count])
}
Things to look out for
There are a couple of issues that may arise that could stop you from building the app (especially in release mode)
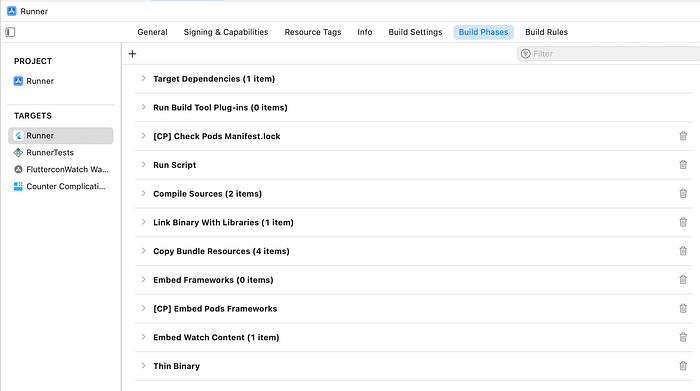
Ensure the "Thin Binary" phase happens after "Embed Watch Content"
Drag the Thin Binary step after the Embed Watch Content step in Runner > Build Phases
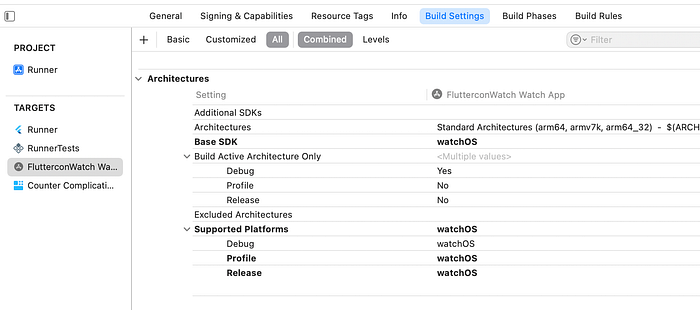
Ensure Watch Target Build Settings target the correct Platform
There is an issue where Flutter overrides the Watch Platform and can then not correctly build the App.
To work around this you have to manually set the Watch App > Build Settings > Supported Platforms for Profile and Release builds to watchOS
Closing thoughts
While the initial setup can be a bit finicky and working around Xcode build errors is certainly not fun, this process shows that Watch Companion Apps for Flutter Apps is possible.
Does this mean you should all build Watch Companion Apps right away? Maybe! It all depends on your app's use cases and, crucially, if it is something that brings a benefit to your users?
In the end a Flutter App is installed just like a native app. So we can use all the benefits of Flutter (write code once run it anywhere, Hot Reload, …) plus use the APIs for platform integration combined with the vast ecosystem on pub.dev to make the best use of platform specific features to provide the best User Experience possible!
—
Follow me here or on Social Media to get notified when the second part of this article is published about adding Complications
Bluesky
Anton (@abausg.bsky.social)Flutter Dev | Author of home_widget 👨🏼💻 / 🚴🏼♂️ / 🥁 / ☕️ he/himbsky.a
bsky.app
Edit description
x.com
Consider sponsoring to support my work
Sponsor @ABausG on GitHub SponsorsGitHub is where people build software. More than 150 million people use GitHub to discover, fork, and contribute to…
github.com
Example App
GitHub - ABausG/flutter_apple_watch_talk: Talk about Flutter on Apple WatchTalk about Flutter on Apple Watch. Contribute to ABausG/flutter_apple_watch_talk development by creating an account on…
github.com