Add or Remove Digital Signature in Microsoft Office Document
Digital signature is an electronic and encrypted signature which shows the authentication of information like email messages, macros, and other documents. In this blog, you will read how you can add or remove digital signature in MS Office file. If in case, the user need help then they can call the expert of MS Office via Www.Office.com/setup.
Create Signature in Word or Excel Document:
To create a signature in the MS Office.com/setup documents, first you should open the worksheet and then place the pointer on the cell where you want to create the signature line. Now, you should visit on the “Insert” tab and then click on the Signature line. Here, you should hit on the “Microsoft Office Signature line” button. Then in the “Signature setup” box, you should type the information which will display under the signature line. Here, you should choose one or both the boxes such as “allow the signer to add comments in Sign box” and “Show sign date in signature line” options.
Also Visit — What is the Method to Recover Lost, Deleted or Unsaved Documents in MS Word?
Remove Digital signatures from Word or Excel Document: To remove the Digital signatures from MS Office files, you should open the document or worksheet which has the visible signature that you want to remove. After this, you should right-click on the Signature line. Now, you should click on the “Remove signature” option and then hit on “Yes” option. Through this way, you can remove Digital signatures from your documents. Always keep in mind, that you can quickly remove a signature just by hitting on the “Signature” pane and then just click on the “Remove signature” option.
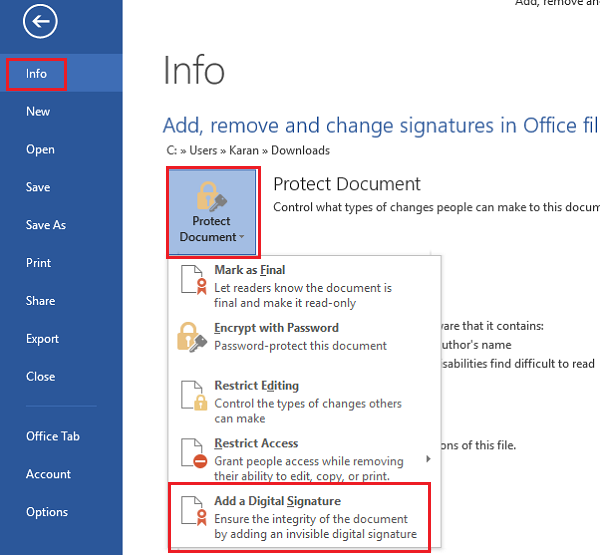
Add Invisible Digital Signatures in Documents: Invisible digital signature, gives surety to the user about the authenticity of the original document. And you can add the invisible digital signatures to your Word, Excel and PowerPoint files. To add the invisible digital signatures in the documents, you should click on the “File” tab and then hit on the “Info” option. After this, you should click on the “Protect Document, Protect Workbook or Protect Presentation” option. Now, you should hit on the “Add a digital signature” button. Then, you have to read the Word, Excel, and PowerPoint message and then hit on the “Ok” button. Here in the “Sign” dialog box, you should navigate to the “Purpose for signing this document” box and then just enter the Purpose. At this point, you should click on “Sign” button. When the file is digitally signed, then you will view the “Signature” button on your computer screen. Now, you can read the file.
Remove Invisible Digital Signatures from Office Files: To remove the invisible digital signatures from Office files, you should click on the “File” tab and then hit on the “Info” option. At this point, you should hit on the “View signatures” button. Here, you will view the “Signatures” window displays on your screen. Then, you should click on the “Remove Signature” and then hit on the “Yes” button. At last, just follow the on-screen directions to complete the procedure. The above method will help you to add or remove digital signature in MS Office. files. If the user need more detail about Digital Signature, then they can contact Microsoft Support team via Office.com/setup.