A Detailed Explanation of Services
https://medium.com/aws-in-plain-english/a-detailed-explanation-of-services-11abf2772ea
Introduction to Service
In Kubernetes, pods are the carriers of applications. We can access applications through the IP address of pods, but the IP address of pods is not fixed, which means it is not convenient to directly access services using the IP address of pods.
To solve this problem, Kubernetes provides a resource called Service. Service aggregates multiple pods that provide the same service and provides a unified entry address. By accessing the entry address of the Service, we can access the pod service behind it.
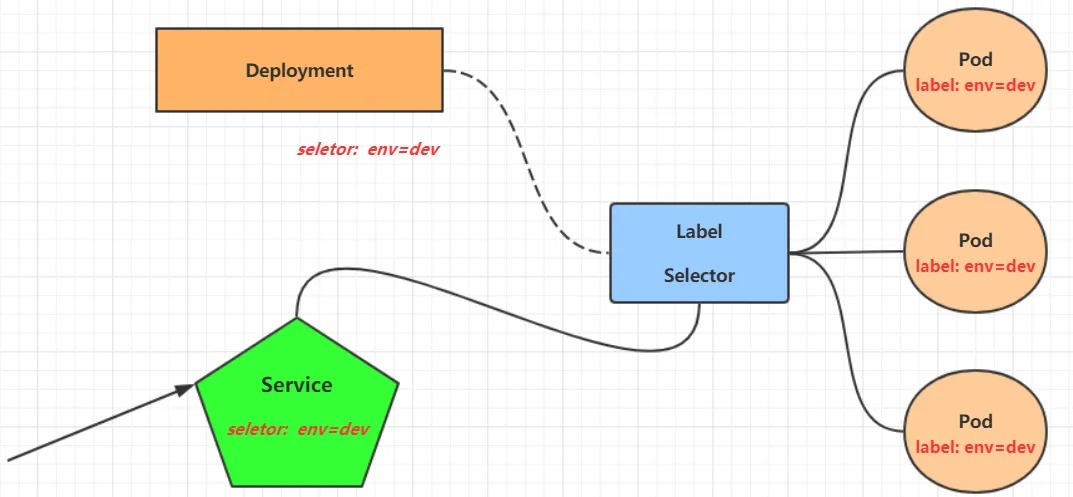
In many cases, Service is just a concept. The working component is the kube-proxy service process, which runs on each Node. When creating a Service, the information of the created service will be written into etcd through the API server, and kube-proxy will discover the changes of this Service based on the listening mechanism. Then, it will convert the latest Service information into corresponding access rules.
# 10.97.97.97:80 is the access entry provided by the service
# When accessing this entry, we can see that there are three pod services waiting for the call behind it.
# Based on the round-robin (RR) policy, kube-proxy will distribute the requests to one of the pods.
# This rule will be generated on all nodes in the cluster, so it can be accessed on any node.
[root@node1 ~]# ipvsadm -Ln
IP Virtual Server version 1.2.1 (size=4096)
Prot LocalAddress:Port Scheduler Flags
  -> RemoteAddress:Port           Forward Weight ActiveConn InActConn
TCP  10.97.97.97:80 rr
  -> 10.244.1.39:80               Masq    1      0          0
  -> 10.244.1.40:80               Masq    1      0          0
  -> 10.244.2.33:80               Masq    1      0          0
Kube-proxy currently supports three working modes:
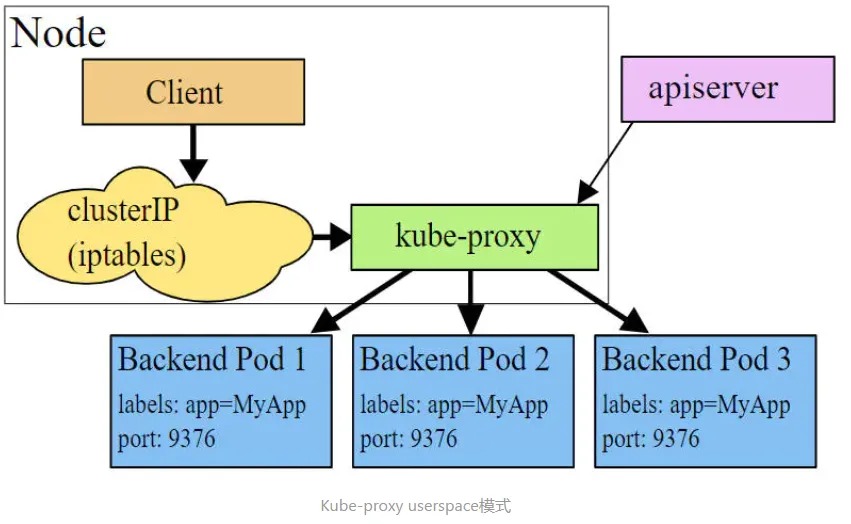
Userspace mode
In userspace mode, kube-proxy creates a listening port for each Service. Requests sent to the Cluster IP are redirected to the port that kube-proxy listens to through iptables rules. Kube-proxy selects a Pod that provides the service based on the LB algorithm and establishes a connection with it to forward the request to the Pod.
In this mode, kube-proxy acts as a Layer 4 load balancer. Since kube-proxy runs in userspace, there is data copying between the kernel and userspace during forwarding processing, although it is stable, the efficiency is relatively low.
Iptables mode
In Iptables mode, kube-proxy creates corresponding iptables rules for each Pod behind the Service and directly redirects requests sent to the Cluster IP to a Pod IP.
In this mode, kube-proxy does not act as a Layer 4 load balancer, but only creates iptables rules. The advantage of this mode is that it is more efficient than userspace mode, but it cannot provide flexible LB policies and cannot retry when the backend Pod is unavailable.

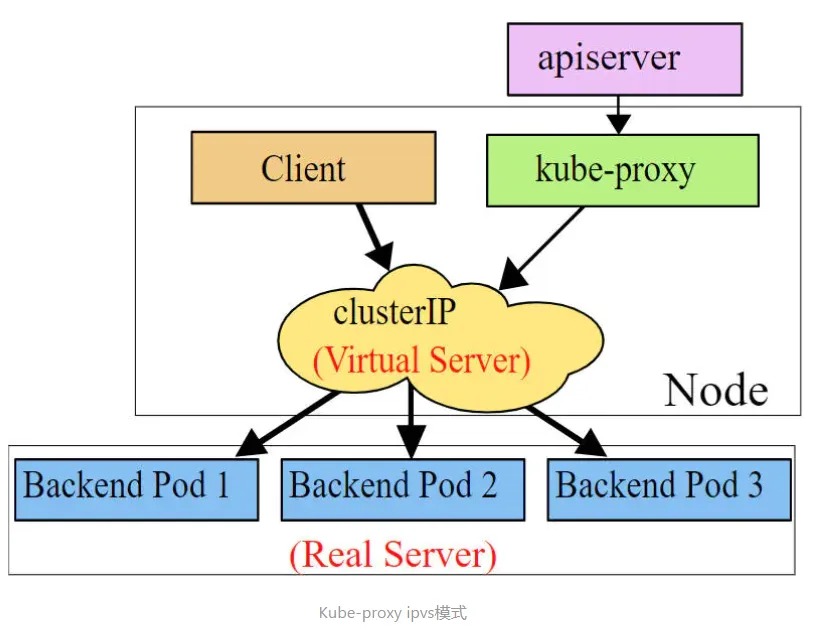
IPVS mode
IPVS mode is similar to iptables mode, kube-proxy monitors the changes of the Pod and creates corresponding IPVS rules. IPVS has higher forwarding efficiency than iptables. In addition, IPVS supports more LB algorithms.
# This mode requires installing the IPVS kernel module, otherwise it will be degraded to iptables.
# Enable IPVS.
[root@master ~]# kubectl edit cm kube-proxy -n kube-system
[root@master ~]# kubectl delete pod -l k8s-app=kube-proxy -n kube-system
[root@node1 ~]# ipvsadm -Ln
IP Virtual Server version 1.2.1 (size=4096)
Prot LocalAddress:Port Scheduler Flags
  -> RemoteAddress:Port           Forward Weight ActiveConn InActConn
TCP  10.97.97.97:80 rr
  -> 10.244.1.39:80               Masq    1      0          0
  -> 10.244.1.40:80               Masq    1      0          0
  -> 10.244.2.33:80               Masq    1      0          0
Service Types
Service resource manifest:
kind: Service  # Resource type
apiVersion: v1  # Resource version
metadata: # Metadata
  name: service # Resource name
  namespace: dev # Namespace
spec: # Description
  selector: # Label selector used to determine which pods the current service proxies
    app: nginx
  type: # Service type, specifying the access method of the service
  clusterIP:  # Virtual IP address of the service
  sessionAffinity: # Session affinity, supports two options: ClientIP and None
  ports: # Port information
    - protocol: TCP
      port: 3017  # Service port
      targetPort: 5003 # Pod port
      nodePort: 31122 # Host port
- ClusterIP: Default value, it is a virtual IP automatically assigned by the Kubernetes system, and can only be accessed within the cluster.
- NodePort: Expose the Service to the outside world through the port on the specified Node, allowing access to the service from outside the cluster.
- LoadBalancer: Use an external load balancer to distribute the load to the service. Note that this mode requires external cloud support.
- ExternalName: Introduce external services into the cluster and use them directly.
Using Service
Experimental Environment Preparation
Before using Service, first create three pods using Deployment, and remember to set the label app=nginx-pod for the pods.
Create deployment.yaml with the following content:
apiVersion: apps/v1
kind: Deployment
metadata:
  name: pc-deployment
  namespace: dev
spec:
  replicas: 3
  selector:
    matchLabels:
      app: nginx-pod
  template:
    metadata:
      labels:
        app: nginx-pod
    spec:
      containers:
      - name: nginx
        image: nginx:1.17.1
        ports:
        - containerPort: 80
[root@master ~]# kubectl create -f deployment.yaml
deployment.apps/pc-deployment created

# View pod details
[root@master ~]# kubectl get pods -n dev -o wide --show-labels
NAME                             READY   STATUS     IP            NODE     LABELS
pc-deployment-66cb59b984-8p84h   1/1     Running    10.244.1.40   node1    app=nginx-pod
pc-deployment-66cb59b984-vx8vx   1/1     Running    10.244.2.33   node2    app=nginx-pod
pc-deployment-66cb59b984-wnncx   1/1     Running    10.244.1.39   node1    app=nginx-pod

# To facilitate testing later, modify the index.html page of the three nginx instances (the IP addresses modified by the three instances are different).
# kubectl exec -it pc-deployment-66cb59b984-8p84h -n dev /bin/sh
# echo "10.244.1.40" > /usr/share/nginx/html/index.html

# After modification, test access
[root@master ~]# curl 10.244.1.40
10.244.1.40
[root@master ~]# curl 10.244.2.33
10.244.2.33
[root@master ~]# curl 10.244.1.39
10.244.1.39
ClusterIP type Service
Create the service-clusterip.yaml file:
apiVersion: v1
kind: Service
metadata:
  name: service-clusterip
  namespace: dev
spec:
  selector:
    app: nginx-pod
  clusterIP: 10.97.97.97 # service IP address, if not specified, a default one will be assigned
  type: ClusterIP
  ports:
  - port: 80  # Service port
    targetPort: 80 # pod port
Execute the following commands:
# Create the service
[root@master ~]# kubectl create -f service-clusterip.yaml
service/service-clusterip created

# Check the service
[root@master ~]# kubectl get svc -n dev -o wide
NAME                TYPE        CLUSTER-IP    EXTERNAL-IP   PORT(S)   AGE   SELECTOR
service-clusterip   ClusterIP   10.97.97.97   <none>        80/TCP    13s   app=nginx-pod

# Check the service details
[root@master ~]# kubectl describe svc service-clusterip -n dev
Name:              service-clusterip
Namespace:         dev
Labels:            <none>
Annotations:       <none>
Selector:          app=nginx-pod
Type:              ClusterIP
IP:                10.97.97.97
Port:              <unset>  80/TCP
TargetPort:        80/TCP
Endpoints:         10.244.1.39:80,10.244.1.40:80,10.244.2.33:80
Session Affinity:  None
Events:            <none>

# Check the ipvs mapping rules
[root@master ~]# ipvsadm -Ln
TCP  10.97.97.97:80 rr
  -> 10.244.1.39:80               Masq    1      0          0
  -> 10.244.1.40:80               Masq    1      0          0
  -> 10.244.2.33:80               Masq    1      0          0

# Access 10.97.97.97:80 to see the result
[root@master ~]# curl 10.97.97.97:80
10.244.2.33
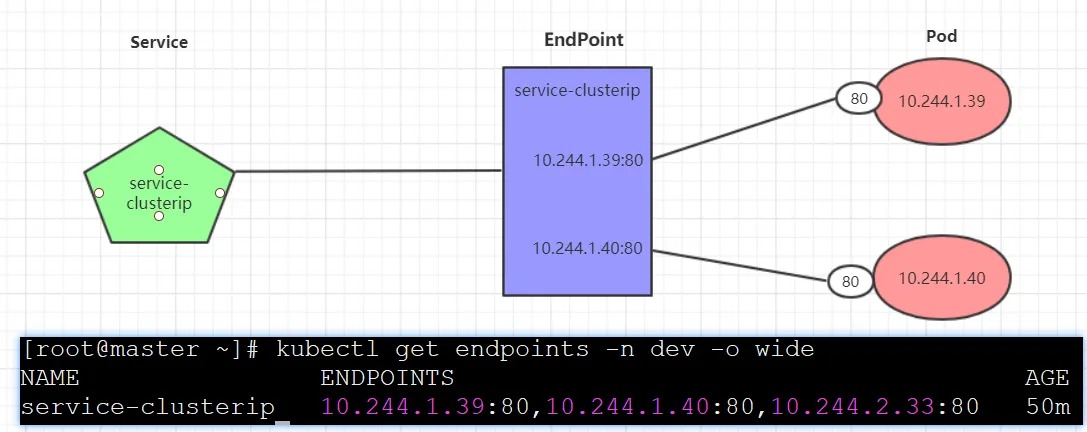
Endpoint
Endpoint is a Kubernetes resource object that is stored in etcd and used to record the access addresses of all pods corresponding to a service, based on the selector described in the Service configuration file.
A Service consists of a group of Pods, which are exposed through Endpoints. In other words, the connection between Service and Pod is implemented through Endpoints, which represent the actual endpoint set of the service.
Load Distribution Strategy
Service requests are distributed to backend Pods, and Kubernetes currently provides two load distribution strategies:
- If not defined, the default strategy used is by kube-proxy, such as random, round-robin.
- Session affinity mode based on client address, meaning that all requests from the same client are forwarded to a fixed Pod.This mode can be enabled by adding the
sessionAffinity:ClientIPoption in the spec.
# View IPVS mapping rules [rr round-robin]
[root@master ~]# ipvsadm -Ln
TCP  10.97.97.97:80 rr
  -> 10.244.1.39:80               Masq    1      0          0
  -> 10.244.1.40:80               Masq    1      0          0
  -> 10.244.2.33:80               Masq    1      0          0

# Loop access test
[root@master ~]# while true;do curl 10.97.97.97:80; sleep 5; done;
10.244.1.40
10.244.1.39
10.244.2.33
10.244.1.40
10.244.1.39
10.244.2.33

# Modify the distribution policy----sessionAffinity:ClientIP

# View IPVS rules [persistent represents persistent]
[root@master ~]# ipvsadm -Ln
TCP  10.97.97.97:80 rr persistent 10800
  -> 10.244.1.39:80               Masq    1      0          0
  -> 10.244.1.40:80               Masq    1      0          0
  -> 10.244.2.33:80               Masq    1      0          0

# Loop access test
[root@master ~]# while true;do curl 10.97.97.97; sleep 5; done;
10.244.2.33
10.244.2.33
10.244.2.33

# Delete service
[root@master ~]# kubectl delete -f service-clusterip.yaml
service "service-clusterip" deleted
HeadLiness type of Service
In some cases, developers may not want to use the load-balancing function provided by the Service but prefer to control the load-balancing strategy themselves. For this situation, Kubernetes provides HeadLiness Service, which does not allocate a Cluster IP. If you want to access the service, you can only query it through the service domain name.
Create service-headliness.yaml:
apiVersion: v1
kind: Service
metadata:
  name: service-headliness
  namespace: dev
spec:
  selector:
    app: nginx-pod
  clusterIP: None # Set clusterIP to None to create a HeadLiness Service
  type: ClusterIP
  ports:
  - port: 80
    targetPort: 80
# Create service
[root@master ~]# kubectl create -f service-headliness.yaml
service/service-headliness created

# Get service and find that CLUSTER-IP is not allocated
[root@master ~]# kubectl get svc service-headliness -n dev -o wide
NAME                 TYPE        CLUSTER-IP   EXTERNAL-IP   PORT(S)   AGE   SELECTOR
service-headliness   ClusterIP   None         <none>        80/TCP    11s   app=nginx-pod

# View service details
[root@master ~]# kubectl describe svc service-headliness  -n dev
Name:              service-headliness
Namespace:         dev
Labels:            <none>
Annotations:       <none>
Selector:          app=nginx-pod
Type:              ClusterIP
IP:                None
Port:              <unset>  80/TCP
TargetPort:        80/TCP
Endpoints:         10.244.1.39:80,10.244.1.40:80,10.244.2.33:80
Session Affinity:  None
Events:            <none>

# Check the domain name resolution
[root@master ~]# kubectl exec -it pc-deployment-66cb59b984-8p84h -n dev /bin/sh
/ # cat /etc/resolv.conf
nameserver 10.96.0.10
search dev.svc.cluster.local svc.cluster.local cluster.local

[root@master ~]# dig @10.96.0.10 service-headliness.dev.svc.cluster.local
service-headliness.dev.svc.cluster.local. 30 IN A 10.244.1.40
service-headliness.dev.svc.cluster.local. 30 IN A 10.244.1.39
service-headliness.dev.svc.cluster.local. 30 IN A 10.244.2.33
NodePort Type Service
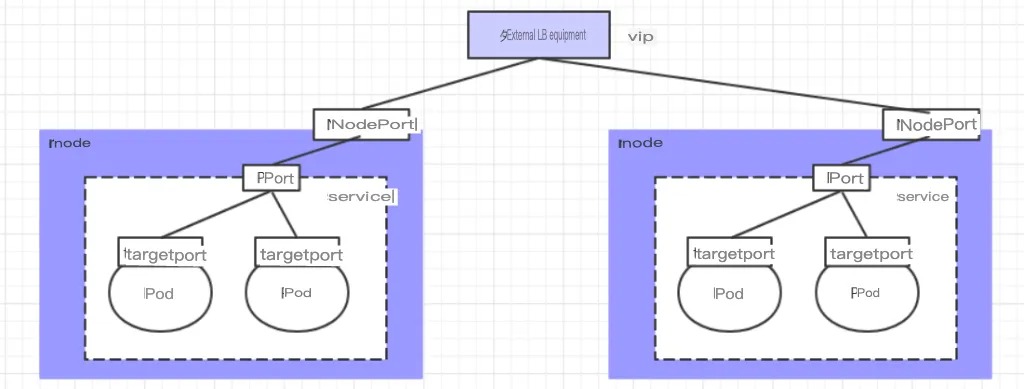
In the previous examples, the Service created only had an IP address that could be accessed within the cluster. If you want to expose the Service to the outside world, you need to use another type of Service called NodePort. The NodePort works by mapping the Service port to a port on the Node, and then you can access the Service through NodeIP:NodePort.

Create the file service-nodeport.yaml with the following content:
apiVersion: v1
kind: Service
metadata:
  name: service-nodeport
  namespace: dev
spec:
  selector:
    app: nginx-pod
  type: NodePort # Set the service type
  ports:
  - port: 80
    nodePort: 30002 # Specify the node port to bind (default value range: 30000-32767); if not specified, it will be assigned automatically
    targetPort: 80
# Create the service
[root@master ~]# kubectl create -f service-nodeport.yaml
service/service-nodeport created

# Check the service
[root@master ~]# kubectl get svc -n dev -o wide
NAME               TYPE       CLUSTER-IP      EXTERNAL-IP   PORT(S)       SELECTOR
service-nodeport   NodePort   10.105.64.191   <none>        80:30002/TCP  app=nginx-pod

# You can now access the pods through the NodeIP and the nodePort (e.g. 192.168.1.100:30002)
Service of type LoadBalancer
LoadBalancer and NodePort are very similar in that they both serve the purpose of exposing a port externally. The difference lies in the fact that LoadBalancer creates an external load-balancing device for the cluster, which requires support from the external environment. Requests from external services that are sent to this device will be load balanced and forwarded to the cluster after being processed by the device.

Service of type ExternalName
The ExternalName type of Service is used to introduce services outside the cluster. It specifies the address of an external service through the externalName attribute, so that accessing this service within the cluster can access the external service.
apiVersion: v1
kind: Service
metadata:
  name: service-externalname
  namespace: dev
spec:
  type: ExternalName # Service type
  externalName: www.baidu.com  # IP address can also be used instead
# Create Service
[root@master ~]# kubectl  create -f service-externalname.yaml
service/service-externalname created

# Domain name resolution
[root@master ~]# dig @10.96.0.10 service-externalname.dev.svc.cluster.local
service-externalname.dev.svc.cluster.local. 30 IN CNAME www.baidu.com.
www.baidu.com.          30      IN      CNAME   www.a.shifen.com.
www.a.shifen.com.       30      IN      A       39.156.66.18
www.a.shifen.com.       30      IN      A       39.156.66.14
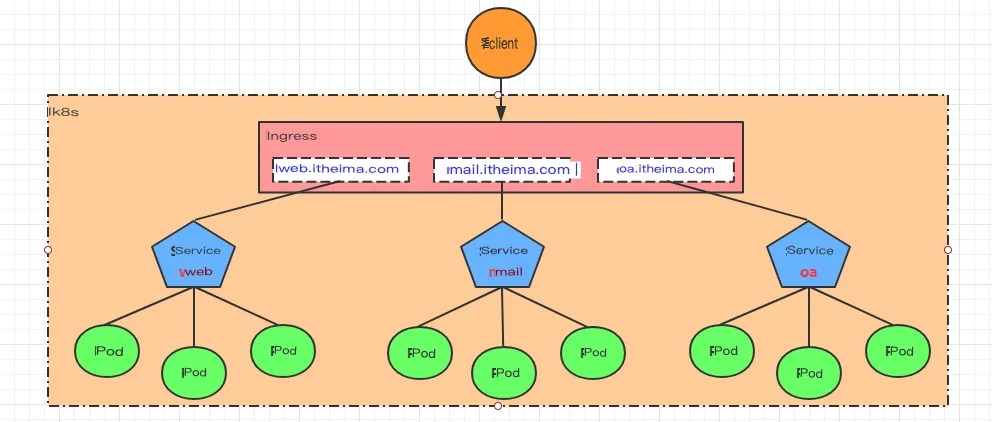
Introduction to Ingress
As mentioned in previous lessons, there are two main ways for a Service to expose itself to the outside of the cluster: NodePort and LoadBalancer. However, both of these methods have certain disadvantages:
- The disadvantage of the NodePort method is that it will occupy many ports of the cluster machines. Therefore, when there are more services in the cluster, this disadvantage becomes more and more prominent.
- The disadvantage of the LB method is that each service requires a separate LB, which is wasteful and troublesome and requires support from devices outside of Kubernetes.
Based on this situation, Kubernetes provides the Ingress resource object, which only needs a NodePort or an LB to satisfy the needs of exposing multiple Services. The working mechanism is roughly represented in the following figure:
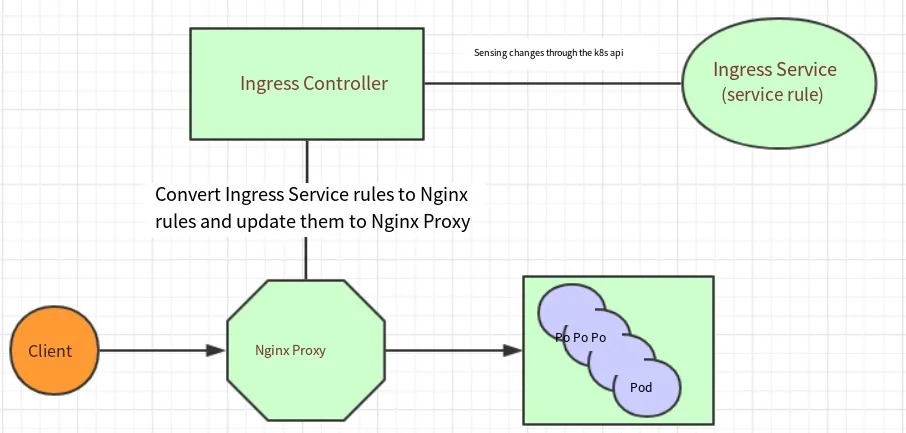
In fact, Ingress serves as a 7-layer load balancer, which is an abstraction of reverse proxy for Kubernetes. Its working mechanism is similar to Nginx and can be understood as establishing multiple mapping rules in Ingress. The Ingress Controller listens to these configuration rules, converts them into Nginx’s reverse proxy configuration, and provides services to the outside world. There are two core concepts here:
- Ingress: An object in Kubernetes that defines how requests are forwarded to services.
- Ingress Controller: A program that implements reverse proxy and load balancing, parses the rules defined in Ingress and implements request forwarding according to the configured rules. The implementation methods can be Nginx, Contour, Haproxy, and so on.
The working mechanism of Ingress (using Nginx as an example) is as follows:
- Users write Ingress rules to specify which domain name corresponds to which service in the Kubernetes cluster.
- The Ingress controller dynamically perceives changes in Ingress service rules and generates a corresponding Nginx reverse proxy configuration.
- The Ingress controller writes the generated Nginx configuration into a running Nginx service and updates it dynamically.
- At this point, a real Nginx is working, which configures the user-defined request forwarding rules internally.
Ingress Usage
Environment Preparation
Set up Ingress Environment
# Create a directory
[root@master ~]# mkdir ingress-controller
[root@master ~]# cd ingress-controller/

# Download ingress-nginx, version 0.30 is used in this example
[root@master ingress-controller]# wget https://raw.githubusercontent.com/kubernetes/ingress-nginx/nginx-0.30.0/deploy/static/mandatory.yaml
[root@master ingress-controller]# wget https://raw.githubusercontent.com/kubernetes/ingress-nginx/nginx-0.30.0/deploy/static/provider/baremetal/service-nodeport.yaml

# Modify the repository in mandatory.yaml
# Change quay.io/kubernetes-ingress-controller/nginx-ingress-controller:0.30.0
# to quay-mirror.qiniu.com/kubernetes-ingress-controller/nginx-ingress-controller:0.30.0

# Create ingress-nginx
[root@master ingress-controller]# kubectl apply -f ./

# Check ingress-nginx
[root@master ingress-controller]# kubectl get pod -n ingress-nginx
NAME                                           READY   STATUS    RESTARTS   AGE
pod/nginx-ingress-controller-fbf967dd5-4qpbp   1/1     Running   0          12h

# Check service
[root@master ingress-controller]# kubectl get svc -n ingress-nginx
NAME            TYPE       CLUSTER-IP     EXTERNAL-IP   PORT(S)                      AGE
ingress-nginx   NodePort   10.98.75.163   <none>        80:32240/TCP,443:31335/TCP   11h
Preparing services and pods
To facilitate the experiment later, create a model as shown in the figure below.
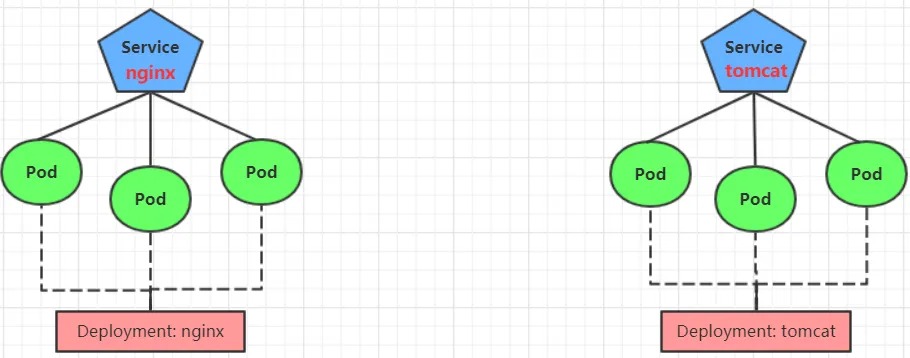
Create tomcat-nginx.yaml
apiVersion: apps/v1
kind: Deployment
metadata:
  name: nginx-deployment
  namespace: dev
spec:
  replicas: 3
  selector:
    matchLabels:
      app: nginx-pod
  template:
    metadata:
      labels:
        app: nginx-pod
    spec:
      containers:
      - name: nginx
        image: nginx:1.17.1
        ports:
        - containerPort: 80

---

apiVersion: apps/v1
kind: Deployment
metadata:
  name: tomcat-deployment
  namespace: dev
spec:
  replicas: 3
  selector:
    matchLabels:
      app: tomcat-pod
  template:
    metadata:
      labels:
        app: tomcat-pod
    spec:
      containers:
      - name: tomcat
        image: tomcat:8.5-jre10-slim
        ports:
        - containerPort: 8080

---

apiVersion: v1
kind: Service
metadata:
  name: nginx-service
  namespace: dev
spec:
  selector:
    app: nginx-pod
  clusterIP: None
  type: ClusterIP
  ports:
  - port: 80
    targetPort: 80

---

apiVersion: v1
kind: Service
metadata:
  name: tomcat-service
  namespace: dev
spec:
  selector:
    app: tomcat-pod
  clusterIP: None
  type: ClusterIP
  ports:
  - port: 8080
    targetPort: 8080
Create:

[root@master ~]# kubectl create -f tomcat-nginx.yaml
Check:

[root@master ~]# kubectl get svc -n dev
NAME             TYPE        CLUSTER-IP   EXTERNAL-IP   PORT(S)    AGE
nginx-service    ClusterIP   None         <none>        80/TCP     48s
tomcat-service   ClusterIP   None         <none>        8080/TCP   48s
HTTP Proxy
Create ingress-http.yaml
apiVersion: extensions/v1beta1
kind: Ingress
metadata:
  name: ingress-http
  namespace: dev
spec:
  rules:
  - host: nginx.itheima.com
    http:
      paths:
      - path: /
        backend:
          serviceName: nginx-service
          servicePort: 80
  - host: tomcat.itheima.com
    http:
      paths:
      - path: /
        backend:
          serviceName: tomcat-service
          servicePort: 8080
# create ingress
[root@master ~]# kubectl create -f ingress-http.yaml
ingress.extensions/ingress-http created

# check ingress
[root@master ~]# kubectl get ing ingress-http -n dev
NAME           HOSTS                                  ADDRESS   PORTS   AGE
ingress-http   nginx.itheima.com,tomcat.itheima.com             80      22s

# check details
[root@master ~]# kubectl describe ing ingress-http  -n dev
...
Rules:
Host                Path  Backends
----                ----  --------
nginx.itheima.com   / nginx-service:80 (10.244.1.96:80,10.244.1.97:80,10.244.2.112:80)
tomcat.itheima.com  / tomcat-service:8080(10.244.1.94:8080,10.244.1.95:8080,10.244.2.111:8080)
...

# Next, configure the host file on your local computer to resolve the above two domain names to 192.168.109.100 (master)
# Then, you can access tomcat.itheima.com:32240 and nginx.itheima.com:32240 respectively to view the effect.
Https proxy
Creating a Certificate:
# Generate the certificate
openssl req -x509 -sha256 -nodes -days 365 -newkey rsa:2048 -keyout tls.key -out tls.crt -subj "/C=CN/ST=BJ/L=BJ/O=nginx/CN=itheima.com"

# Create the secret
kubectl create secret tls tls-secret --key tls.key --cert tls.crt
Create ingress-https.yaml
apiVersion: extensions/v1beta1
kind: Ingress
metadata:
  name: ingress-https
  namespace: dev
spec:
  tls:
    - hosts:
      - nginx.itheima.com
      - tomcat.itheima.com
      secretName: tls-secret # Specify the secret
  rules:
  - host: nginx.itheima.com
    http:
      paths:
      - path: /
        backend:
          serviceName: nginx-service
          servicePort: 80
  - host: tomcat.itheima.com
    http:
      paths:
      - path: /
        backend:
          serviceName: tomcat-service
          servicePort: 8080
# Create the ingress-https.yaml
[root@master ~]# kubectl create -f ingress-https.yaml

# Check the ingress
[root@master ~]# kubectl get ing ingress-https -n dev
NAME            HOSTS                                  ADDRESS         PORTS     AGE
ingress-https   nginx.itheima.com,tomcat.itheima.com   10.104.184.38   80, 443   2m42s

# Check the details
[root@master ~]# kubectl describe ing ingress-https -n dev
...
TLS:
  tls-secret terminates nginx.itheima.com,tomcat.itheima.com
Rules:
Host              Path Backends
----              ---- --------
nginx.itheima.com  /  nginx-service:80 (10.244.1.97:80,10.244.1.98:80,10.244.2.119:80)
tomcat.itheima.com /  tomcat-service:8080(10.244.1.99:8080,10.244.2.117:8080,10.244.2.120:8080)
...

# Now you can visit https://nginx.itheima.com:31335 and https://tomcat.itheima.com:31335