How to Create Honeypot Scam Token | Full Guide
Honeypot Token Contract Code
To get started, we'll need:
- Metamask Browser Extension - How to Setup Metamask Guide
- Add Binance Smart Chain to Metamask - Guide
- Some BNB on Metamask Wallet - How to Buy BNB Guide
- Honeypot smart contract - Link
❓For any questions: @badcryptom
❗Attention: this is a free contract with a completely disabled selling function, including the creator of the token! The creator can withdraw all liquidity from the pool.
✅ Visit the updates channel and check out the paid contracts options that have additional functionality
👉 https://t.me/honeypot3
🎯How to create token?
👉Step 1: Create contract file
Go to https://remix.ethereum.org/ and Create new file "YourName.sol"

👉Step 2: Add contract code
Copy and paste the Honeypot contract code into the workspace that opens
Honeypot smart contract - Link

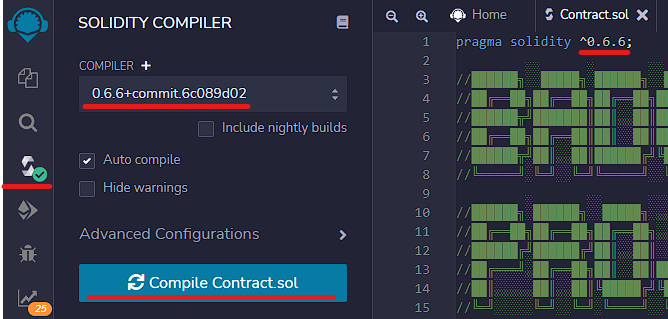
👉Step 3: Solidity Compiler
Go to the 3rd tab. Contract version and Compiler version must match!
Compiler: 0.6.6
If contract don't have any errors then you will see green check mark on Compiler icon like on screenshot
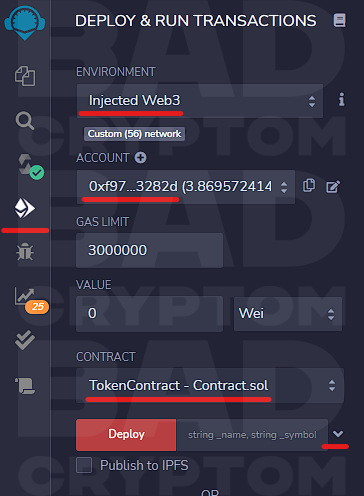
👉Step 4: Deploy
Go to the 4th tab
Environment: Select "Injected Web3"
Account: Your Metamask wallet (Binance Smart Chain network)
Contract: Select "TokenContract - YourName.sol
Against the Deploy button, click on the arrow to open the token menu
Fill in the token information
NAME = Your token name
SYMBOL = Your token symbol
TOTALSUPPLY = Total tokens amount
The contract architecture is written in such a way that liquidity is added automatically immediately after the token is created
LIQUIDITY = The number of scam tokens that will go to the liquidity pool. The number must not exceed TOTALSUPPLY
VALUE = The amount of BNB that will go to the liquidity pool. At least 0.5 BNB can be added, otherwise the token will not be able to function.
In the drop-down window, select Finney instead of Wei
Enter a minimum of 500 Finney. 1000 Finney = 1 BNB etc.

Click Transact and Confirm transaction
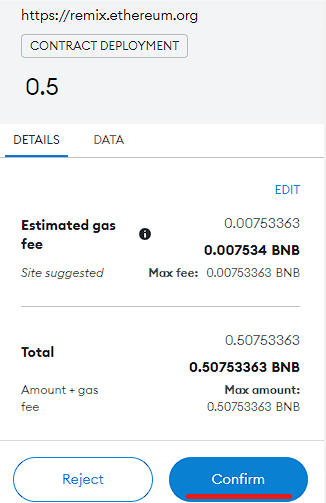
✅Done. Token created!
Your wallet will be credited with all tokens, minus the amount sent to liquidity.
The contract will automatically add a liquidity pair to PancakeSwap, and will send you LP tokens (I will tell you what to do with them below)
❗The token will be available for purchase on Pancakeswap immediately after creation!
The contract address for importing tokens into Metamask or Pancakeswap will appear under the Deploy button in the Deployed Contracts section.
Click on the "Copy" icon to get the full contract address

📈How Honeypot works
For example let's buy 1 token
If necessary, approve contract before swap

Now let's try to sell
If necessary, approve the contract before swap
And we'll see this. Nobody can sell

📉RugPull time
In order to pull all the liquidity back you must have LP tokens of your liquidity pool. PancakeSwap will automatically send them to your wallet after creating the token.
What are LP tokens?
LP tokens - are a representation of the share of funds in the liquidity pool.
The smart contract address of an LP token = the address of the liquidity pool.
Important: By creating a new liquidity pool and depositing your scam tokens there, you are the sole owner of all funds that will go into that pool after the exchanges.
Taking liquidity out
Under the Deploy button in the section where you specified your token information, you can see your contract at the bottom. Click the arrow and expand the creator menu

In the input field, specify what percentage of the pool you want to withdraw to your wallet. Click the RemoveLiquidity button and confirm the transaction

The funds will instantly appear in your wallet
Add additional liquidity
- In the input field VALUE type amount of BNB
- In the input field AddLiquidity type amount of tokens
- Click the AddLiquidity button and confirm the transaction

The contract will automatically add additional liquidity to the pool and send you additional LP tokens