Faucet Installation Facilitated: Why Exchanging Your Sink Fixture Isn't as Difficult as You Assume
If you can assemble a bookshelf without swearing, you can install a tap. The difference is water moves, wood doesn't, and blunders get wet quickly. That's where individuals freeze up. I get it. I have actually drawn more than one soaked vanity drawer since somebody presumed plumbing technician's tape might cure a misaligned supply line. However with some clear thinking, a couple of low-priced tools, and a determination to get a little confined under the sink, faucet installation becomes a straightforward, satisfying task. You'll save money, discover just how your plumbing acts, and walk away with a component that doesn't wiggle, trickle, or stain.
I've switched thousands of taps in homes that ranged from new apartments to mid-century places with galvanized pipelines that appeared like they would certainly dealt with a long war. Most installs take under an hour when whatever coordinates and 2 to 3 hours when it doesn't. If you spending plan an afternoon, you'll have time to clean the closet flooring, re-caulk the backsplash, and still make dinner.
Why individuals overstate faucet installsIt's the crawl space. Not the one under the house, the one under your sink. The small, dark cabinet where someone crammed a disposal, cleaning up materials, and a tangle of hoses. That's the mental obstacle. The auto mechanics are easy: shut water, get rid of old component, tidy the deck, set new tap, connect water, check for leaks. The complexity originates from your certain sink and the ghosts of any individual who touched it prior to you.
If you can prepare for the typical snags and gather the right materials, the task goes from distressed uncertainty to a neat series. There's a factor a great deal of plumbings do not bring an assistant for this job. One person can do it conveniently if they prepare well.
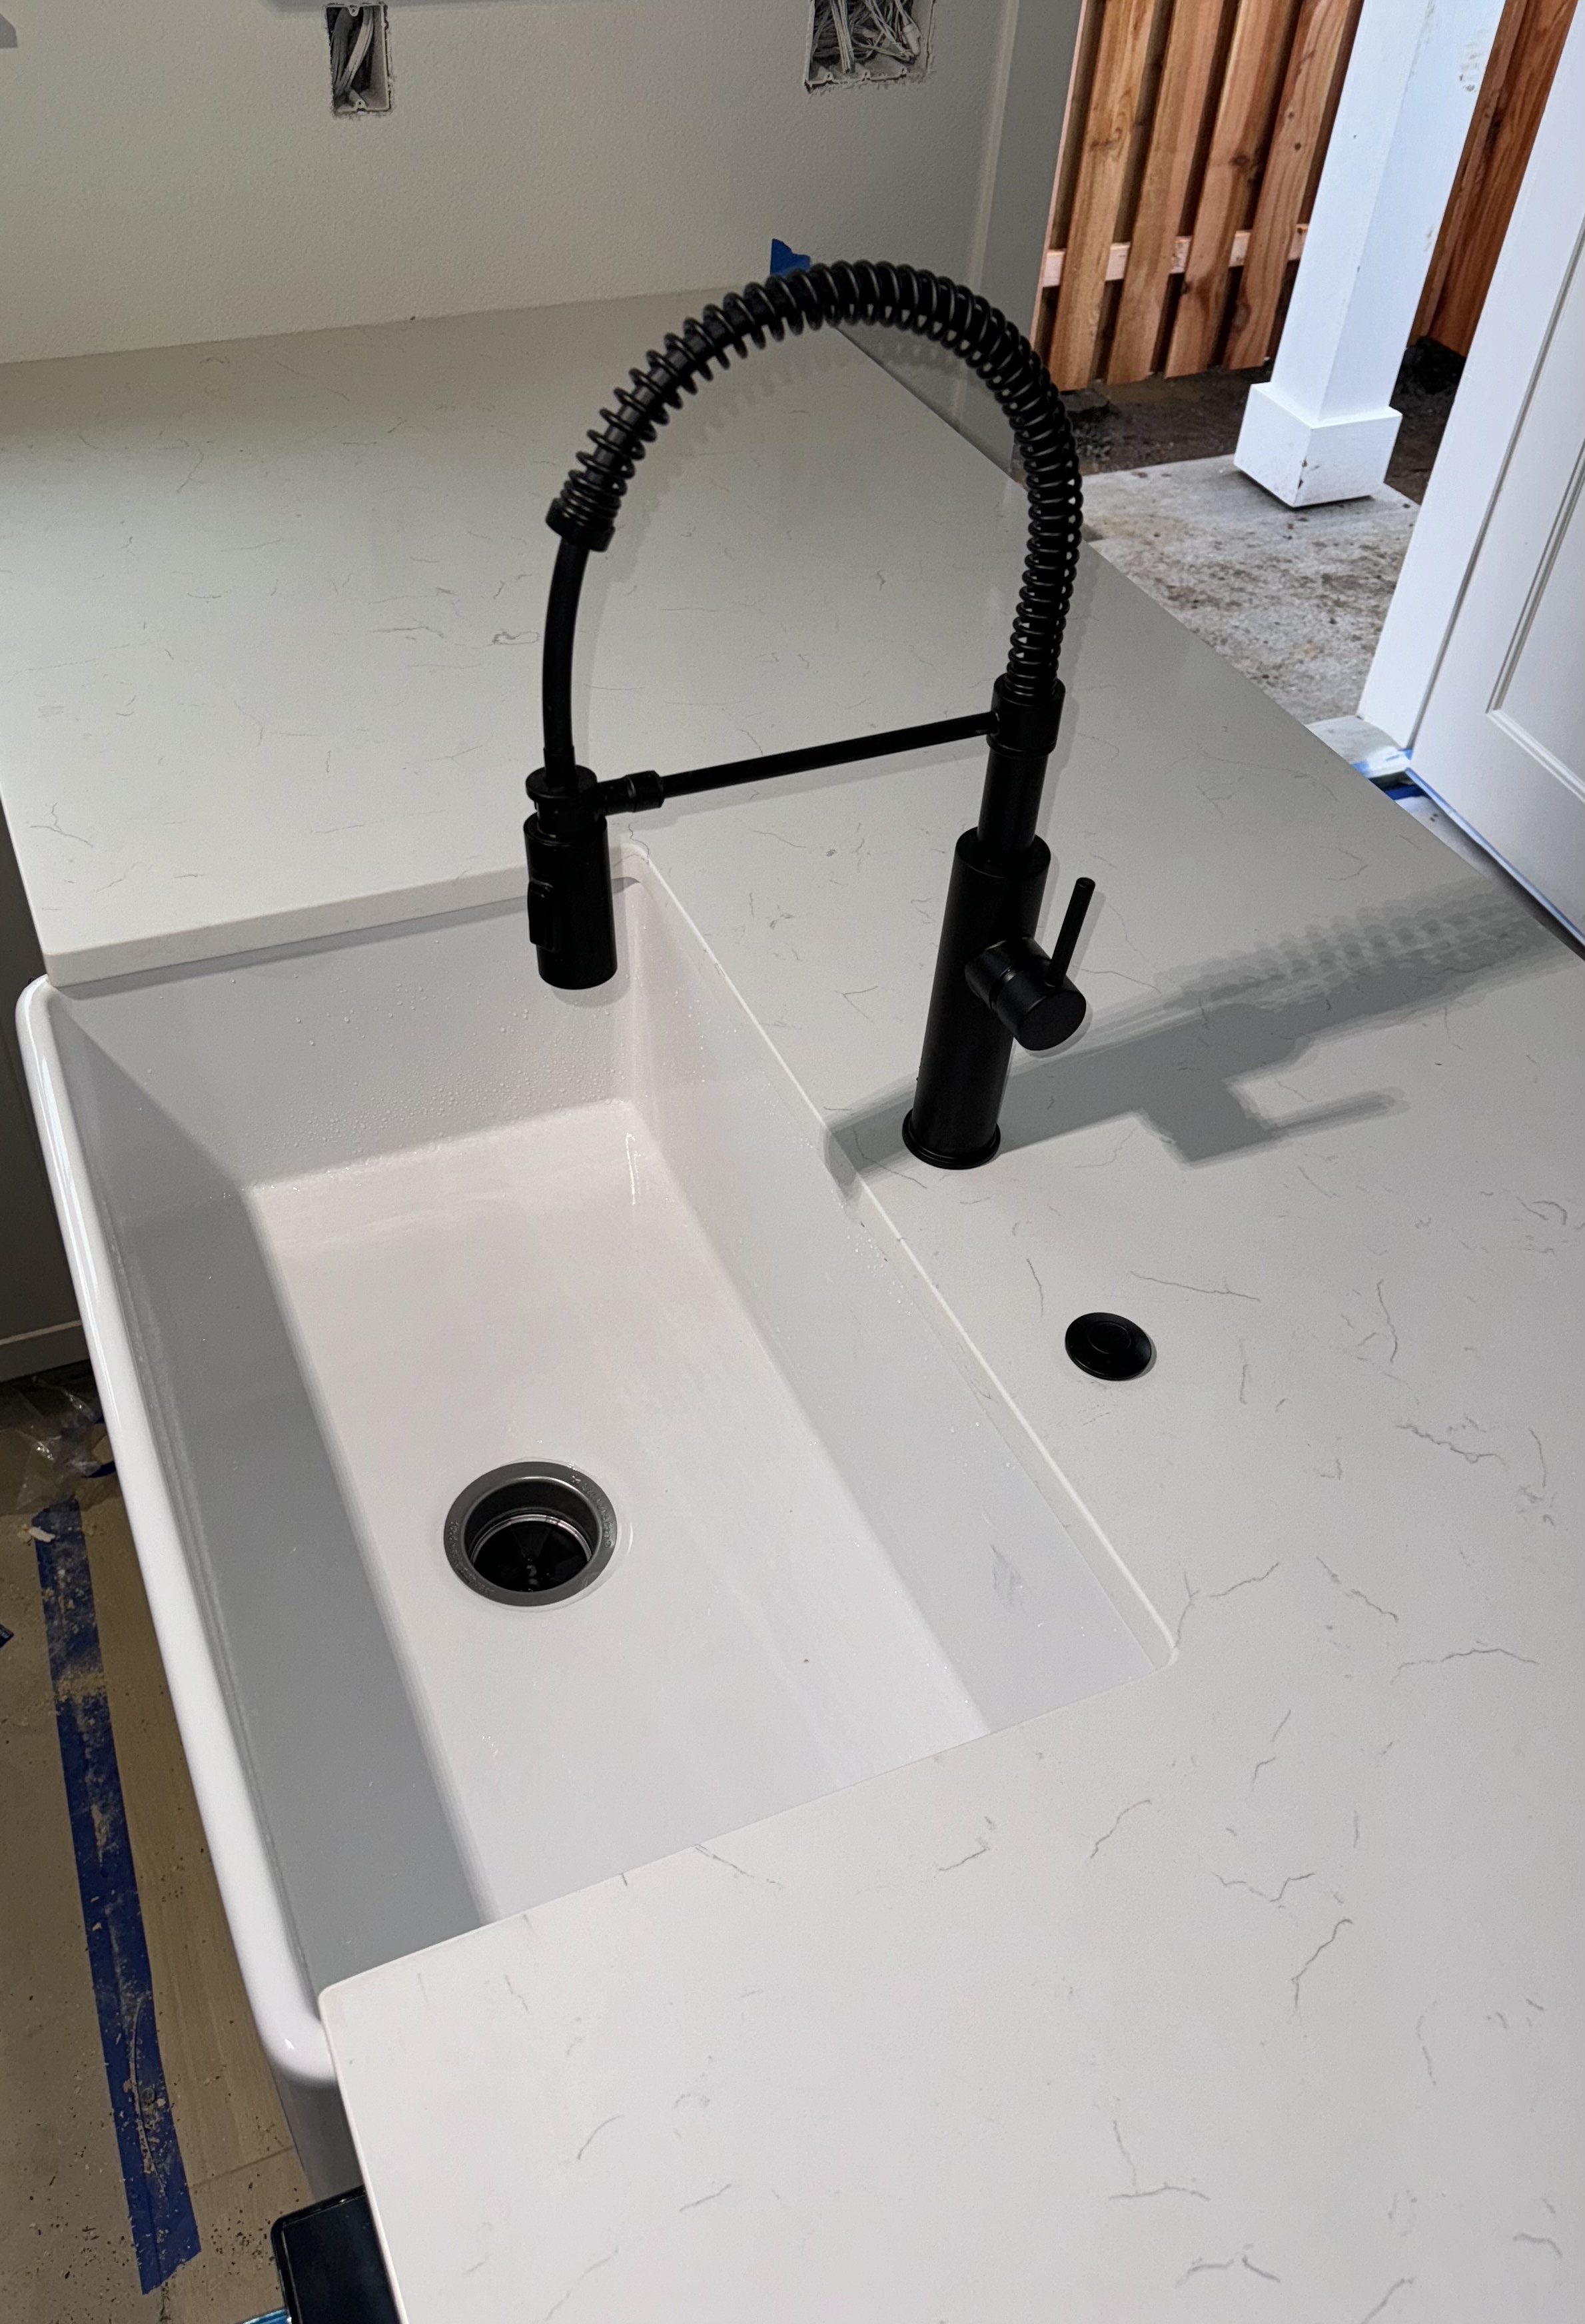
Know your sink and tap style before you buyEvery tap have to fit the openings in your sink or counter top. This matters greater than surface, brand, or deal with shape. You'll usually run into three hole patterns:
Single-hole: Modern taps with a pull-down sprayer generally utilize this. If your sink has 3 openings, a lot of single-hole taps consist of an escutcheon plate to cover the extras.
Centerset 4-inch: Two deals with and a spout rest on a solitary base that drops right into 3 holes spaced 4 inches apart. Usual on older shower room sinks.
Widespread 8-inch: Three different items, 2 manages and a spout, spread across 3 openings that are 8 inches apart or flexible within a range.
Kitchen sinks make complex things with devices like side sprayers, soap dispensers, or filtered tap. Check the bottom of your sink or counter top to confirm hole placements and spacing. If you have a drop-in sink, you'll see the openings. If you have an undermount rock top, feel beneath or make use of a flashlight from above to see how many spaces you have.
As for valves and compatibility, most contemporary household taps use versatile knotted supply lines with a 3/8-inch compression connection. If your shutoff valves are older 1/2-inch IPS or, worse, flared, grab adapters before you begin. Nothing kills energy like a shock thread inequality at 6 pm on a Sunday.
Tools that make the task painlessI have actually seen individuals link themselves in knots with large wrenches and sore wrists. A few basic devices and consumables get rid of the headache:
Basin wrench, plumbing professional's putty or silicone (relying on your sink and supplier assistance), channel-lock pliers, flexible wrench, energy knife. Teflon tape for threaded links, a little towel, flashlight or headlamp, and a bucket. Two brand-new 3/8-inch knotted supply lines if your tap does not include them or if the old ones look tired. Optional however wise: a portable ratcheting wrench with deep outlets for faucet nuts, a putty knife, white vinegar for mineral deposit removal, and a roll of paper towels.That basin wrench is the unrecognized hero. It gets to those placing nuts behind the sink basin where your hands can't fit. Do not miss it.
The water shutoff: tiny shutoffs with large attitudesUnder the sink, you'll have 2 angle quits, one for warm, one for cool. Transform them clockwise to close. If they haven't relocated years, they might stand up to or weep. Don't compel a stuck shutoff with Hunk toughness; back it gently, close it once again, and see if it behaves. If a valve won't close fully, shut the major water to the house. It's not dramatic, it's smart.
Once water is off, open the faucet to eliminate stress. Maintain the supply lines connected while you verify the shutoffs genuinely closed. A slow-moving trickle may proceed for a couple of seconds. That's penalty. A consistent circulation means your shutoff is lying to you.
Removing the old faucet without a meltdownClear the closet. Lay a towel. Place a container under the connections. Crack the supply nuts at the shutoffs initially, not at the faucet. If a knotted line looks torn or corroded, it has made a one-way trip to the trash. Disconnect the lines and allow residual water drain right into the bucket.
Now search for. You'll see one or two tap mounting nuts on the underside of the sink deck. Faucet Installation Service in Oak Grove That's where the container wrench earns its maintain. Rise, hold the nut, and loosen up counterclockwise. Some old installs utilize horseshoe-shaped retainers with a screw; others utilize plastic wing nuts you can transform by hand. If somebody used thread-locking substance in a fit of misdirected zeal, use a little penetrating oil and provide it a couple of minutes.
Once the nuts are off, the faucet will prepare to lift. From above, delicately tear if it's stuck. Natural resources or old putty can adhesive it down. Utilize a putty blade, job gradually, and try not to damage the surface area. Draw the tap, eliminate any type of deck plates, and afterwards strike the mess. A little white vinegar softens calcium. Avoid rough pads that can haze stainless-steel or scrape porcelain. You desire a tidy, level surface area for the new seal.
Plumber's putty or silicone, and where people go wrongManufacturers typically define which to use. Review the sheet, not due to the fact that it's riveting literary works, yet since it protects against leaks. Plumber's putty stays soft and is ideal for metal sinks and several deck plates. Do not utilize it on natural rock like granite or marble unless it's classified non-staining. Silicone deals with everything, however it can be unpleasant, and the following individual will certainly curse your name while scratching it off. If you opt for silicone, a tiny, even grain is plenty. The seal happens from compression, not from a tube filled with goo.
Dry fit twice, tighten onceBefore you press anything, set the tap on the deck to validate placement, reach, and opening coverage. Examine that manages clear the backsplash which a pull-down sprayer can withdraw freely under the sink without getting on the disposal or cleaning caddies. If your faucet consists of a weight for the sprayer pipe, find a clear decline zone so gravity can do its task. Mark the hose pipe with tape where the weight should live, normally a foot approximately above the bottom loop.
Now devote. Apply putty or silicone as directed, established the faucet, and from below, mount the mounting equipment. Tighten uniformly. The goal is firm, not gorilla-tight. Over-torque can crack porcelain and deform metal plates, which ironically creates leaks. Verify the faucet doesn't revolve on the deck. If it does, tighten up a touch more.
Supply lines: little gaskets, huge consequencesIf your faucet includes integrated supply lines, life is straightforward. Otherwise, thread on new knotted lines to the faucet tails by hand first, after that snug with a wrench. Really feel for smooth engagement. Cross-threading below makes a mess you'll spend for later.
At the shutoffs, cover male threads with two to three turns of Teflon tape just if you're securing conical pipe strings. Compression installations usually don't want tape. Many angle quits with 3/8-inch compression ports secure on the ferrule and needs to be joined clean and dry. Finger-tight plus a quarter transform with a wrench is normally enough. If you really feel the ferrule bite, quit early, examination, and tighten just if you see a drip.
If you have an older home with flared installations or stiff copper supplies, adaptors are your pal. A short length of braided stainless pipes reduces stress and vibration, especially with a pull-down sprayer.
Close the tap manages. Fracture the shutoffs open individually, gradually. Pay attention. You'll listen to air cleanup. View every joint: the tap base, the supply connections at the tap, and the shutoffs. A bead of water is a warning, not a catastrophe. Tighten a hair more up until the bead stops expanding. Wipe everything dry, then run the tap on cold, then warm, then both. Examine once more. Run the sprayer if you have one, after that enjoy the tube where it fulfills the tap body. Many leaks hide there.
Let the water run for a minute to flush manufacturing debris and loosened up mineral crumbs. If your tap has a removable aerator, unscrew it and rinse. New fixtures often spew tiny black rubber bits from the pipes. That's normal for the very first run.
What can go wrong and how to recoverStubborn shutoff valve that will not secure: Change the shutoff, or shut down your home water, eliminate the handle and stem, and swap the washer. If you do not intend to draw a valve today, shut the main, set up the tap, after that reopen and observe. If the old shutoff weeps also when open, put a little towel under it and intend a fix soon. Do not neglect an active drip.
Leaking at the faucet base: If you used silicone, it may take an hour to skin over. If water is wicking under the deck, your installing gasket may be misaligned or the deck isn't flat. Loosen up somewhat, reseat with even pressure, and retighten. With putty, you can lift carefully, roll a fresh rope, and reset.
Weak circulation: Most often the particles display in the aerator clogged throughout the very first flush. Wash it. If that does not restore pressure, inspect the supply shutoffs are completely open which the hot and cold aren't reversed and half-closed.
Sprayer won't pull back: The weight remains in the incorrect area or capturing on something. Remove containers and baskets under the sink. Shift the weight so it can move easily. Some cabinets require a small stick-on slide or a hook to direct the hose away from obstructions.
Weeping compression joint: Back off, straighten the tubing, and retighten. Over-tightening can warp the ferrule and make securing even worse. The wonderful place is firm without panic.
The case for changing supply lines every timeI don't recycle knotted lines unless they're new and part of a matched system. Rubber ages. A $12 pair of lines is cheaper than one water-damaged cupboard. If your faucet gets here with lines kinky right into the body, take into consideration that a function. Fewer joints, fewer points of failure.
Bathroom vs. kitchen area: exact same concepts, various quirksBathroom faucets reside in tight quarters and sit near to a backsplash. That brief distance issues. Some single-handle models turn back for warm water and will smack tile if you do not measure. Try to find versions made with forward-only handle movement for shower room containers near walls.
Kitchens juggle extra. Disposals, dish washers, filters, and soap dispensers compete for area. The sprayer tube needs clear travel, and the tap elevation must make good sense under cupboards. High industrial-style faucets look wonderful in a directory and can splash like a water fountain on a superficial sink. If you own a 6-inch deep sink, choose a faucet with a lower arc or a splash-controlling aerator. Your shirt will certainly thank you.
Materials, coatings, and what in fact holds upI've seen budget plan taps run tidy for a decade and costs ones gunk up in two years as a result of negative water. The interior shutoff issues more than the shine. Ceramic disc cartridges are the requirement for sturdiness and smooth movement. For coatings, brushed nickel and stainless conceal fingerprints. Chrome cleans up conveniently and reveals its age honestly. Matte black looks sharp, however it shows mineral places unless you wipe it. PVD coverings resist deterioration and are worth the upgrade if your home has tough water.
Weight doesn't constantly equal high quality. Some business add heft that doesn't improve feature. Focus on solid installing equipment, replaceable cartridges, and flexible supply lines that do not kink under hand pressure.
When to call a pro without apologyThere's no medal for doing definitely everything on your own. If you see rusty shutoffs integrated to thin copper stubs, or if a previous owner soldered wild adapters so the area appears like brass pastas, think about a plumbing technician. If your sink deck is fractured, or you're changing from a three-hole to a single-hole on a rock counter top, you'll want a maker to drill cleanly. And if the major shutoff doesn't function and the city shutoff is hidden or locked, quit and set up aid. Satisfaction has a price, and sometimes it's well worth paying.
Care that maintains a new faucet newWipe it completely dry once in a while. That's the key. A soft fabric after hefty use stops mineral crust from building. If your water is hard, a 50-50 mix of vinegar and water breaks down places. Don't utilize severe abrasives or powders that can scratch. Replace the aerator every couple of years or saturate it in vinegar and brush lightly with an old tooth brush. Operate the deal with delicately. Slamming shutoffs reduces cartridge life.
The realistic time budgetIf every shutoff transforms, every nut spins, and the faucet fits, you can be carried out in 45 minutes. Add an hour if you're eliminating stubborn substances or battling cramped gain access to. Worst case with a stuck valve or a run to the store for adapters, you'll spend three hours and learn more than you planned. That's not a negative afternoon.
A fast, tidy operations that never ever fails Clear the closet, closed the water at the valves, and validate by opening the old faucet. Area a bucket and towel. Disconnect supply lines at the valves, eliminate mounting equipment, pull the old faucet, and clean the deck. Dry-fit the new faucet, validate manage clearance, use putty or silicone, after that install and tighten evenly. Attach supply lines, minding compression vs. pipe threads, and route the sprayer hose with an effectively put weight. Pressurize slowly, inspect every joint, run water to purge, examine again after ten mins, after that one more time after an hour.Follow that sequence and you avoid 90 percent of the headaches I see on solution calls.
Faucet installation isn't simply an expense saver. It's a portal task that debunks pipes. You'll recognize where your water originates from, just how shutoffs behave, and what materials live under your sink. The following time you listen to a drip, you won't really feel defenseless. You'll understand exactly where to look and what to touch. And if you ever before do call a pro, you'll talk their language and improve work for a reasonable price.
The best part is the prompt payoff. Transform the handle, see a clean stream arc where there was a sputter in the past, and really feel the smooth traveling of a ceramic shutoff that really reacts. It's pleasing in a way that new cabinet draws or a fresh layer of paint can not match, due to the fact that it links form to function. The fixture you use a lots times a day comes to be a little item of engineering you set in area yourself.
A strong tap mount comes down to respect for easy steps, not magic. Shut water, make clean joints, prevent strength, and check your job. Do that, and swapping your sink fixture won't just be much easier than you believe, it will feel noticeable. That's the secret specialists find out after the initial few. You can discover it in an afternoon.
And if you ever before questioned whether the phrase Faucet Installation belongs on a DIY list you can dominate, consider this your thumbs-up. Get a basin wrench, a towel, and a little perseverance. The rest will follow.
Principled Plumbing LLC
Oregon City, Oregon
(503) 919-7243
https://www.principledplumbing.com/
Review us on Google